New Here? Read The Story behind the Box

Showing posts with label jams and jellies. Show all posts

Tuesday, March 13, 2012

apple butter in a slow cooker

My kindergartner's class has a class "pet" in the form of a teddy bear known as Super Bear. Each kid in the class gets to take Super Bear home for the weekend a couple of times during the year. Super Bear comes with his very own journal, where his host's parents have to get to write about what adventures Super Bear had with the family. Lucky parents! They even are encouraged to include photos, drawings, ticket stubs or other crap very exciting memorabilia.

Don't get me wrong. I actually like it. My son loves having the bear here, and I am happy to photograph and record the things we do over the weekend. I am happy to write about it and glue in the pictures and send it all back to entertain the kiddos.

It just feels like so much pressure. What if our weekends are more boring than everyone else's? What if I forget to take pictures? What if we forget to bring the bear and the journal back on Monday morning? What if Super Bear gets dirty or torn? What if Super Bear gets lost?


Anyway, my particular little charming kindergartner managed to convince his mom and dad that having Super Bear as a guest at the house was a very. special. occasion. And that the very boring weekend we had on the books would never do. And that the bear... the stuffed bear... really wanted to go to the zoo.

As it turns out, we really didn't have much planned, and it was a beautiful weekend. A go swimming-go hiking-play baseball-be warm-soak up the sun kind of weekend. And yes, it ended up being a go-to-the-zoo kind of weekend as well.

I also picked up my Abundant Harvest box of produce this weekend. One of the optional add-on items was a 10-pound bag of really ugly apples for only $3. I'm not just being mean when I call them really ugly. The farmer himself told me so.


Although truthfully, I didn't think they were all that bad. They weren't ugly as much as lopsided. And some had warts.


But all told, there was only one bruise on one apple out of the two 10-pound bags I bought. I had gotten them with the idea of making apple butter out of the ugly little guys, but to my pleasant surprise I found that they were perfectly fine to just bite into and enjoy a delicious snack.

As I was retrieving the photos of the apple butter process, you would think that I had uploaded different cameras from different people all weekend:

A couple of pool pictures, a crockpot full of raw apples, a picture of the teddy bear at the zoo, a crockpot full of cooked apples, a picture from Bob's Big Boy restaurant, a picture of jars of apple butter sealed, labeled and ready to store.

Truthfully, although the apple butter requires a decent session of apple peeling and chopping, and a very long cooking process (13 hours in the crockpot, all told), it is very hands-off cooking. Let it slowly turn from apples and sugar and spices into delicious, smooth, silky, sweet apple butter while you go out and have fun!

First, peel and dice a crockpot full of apples. Mix together some sugar and spice and stir that into the apples.


Then, go out and enjoy a swim and some relaxation in the sun.


After an hour, turn the crockpot to low and leave it for 11 more hours. By the time that is done, you will have very soft apple pieces floating in brown, sugary, sweet juice.


While that is all happening, take a trip to the zoo.


After the 11 hours are done, take the lid off of the crockpot. Give the apples a big stir and let them cook for another hour with the lid off. Give it a good stir every so often. Or... go out for a hamburger.


After an hour, the apples should have turned into a lovely brown sauce. If you give it a real good whisking, you will end up with very small lumps. This is fine as it is, but I chose to give mine a whirl in the blender to get it all to a smooth consistency. (I have those dang picky kids who don't like lumpy food.)


Finally, pour it into jars and process them in boiling water. You now have about 6 or 7 pint-sized, beautifully sealed jars of apple butter than taste like a little bit of heaven and will keep for a year or more! (If you can stand to wait that long).


Here is the recipe:

5-9 pounds of apples
4 cups sugar
2 teaspoons cinnamon
1/4 teaspoon cloves
1/4 teaspoon salt

Peel and chop enough apples to fill your crockpot. You will use anywhere from 5-9 pounds, depending on how small you chop. The larger you chop them (and therefore the fewer apples you use) will mean that you might want to use a little less sugar.

Stir together the sugar, cinnamon, cloves, and salt, and then stir it into the apples.

Turn the crockpot on high for an hour. Then, turn it to low and let it cook 11 more hours.

After 11 hours, take the lid off and give the apples a good stirring. Let it cook one more hour with the lid off, stirring occasionally. After an hour, whisk it thoroughly. It should have some very small lumps. If you want, puree it in a blender or food processor to make it smooth.

Ladle into clean mason jars, and process in boiling water.

Here is a chart for processing times from The National Center for Home Food Preservation:


Table 1. Recommended process time for Apple Butter in a boiling-water canner.
Process Time at Altitudes of
Style of PackJar Size0 - 1,000 ft1,001 - 6,000 ftAbove 6,000 ft
HotHalf-pints or Pints5 min1015
Quarts101520

If you don't know much about canning, here is a great set of instructions and information.

Monday, December 12, 2011

pumpkin (or squash) butter

Do you shop at Trader Joe's? I have heard stories that some people in our great nation don't live close enough to a Trader Joe's to make shopping there feasible. I give my deepest sympathies to any of you who don't have Joe in your neighborhood.


The greatest thing about Trader Joe's is not that they have great prices (although they do). It's not that they have a good selection of organic or gluten-free or nitrate-free or sugar-free (although they do). It's not that they have a whole bunch of convenience foods -- think frozen pizza or pre-made cheesecake -- that manage to still be made of real ingredients (although they do). The great thing about Trader Joe's is that they do all of these things, and they manage to have an absolutely astounding variety of products. Every time I am in the store, there is something I have never noticed before. And any time I talk about Trader Joe's with a friend, I learn about their favorite product, which also is quite often something I have never noticed before. I could spend hours in that place perusing the aisles, finding all manner of yummy treats I have never tried.


As a matter of fact, I would love to hear what is on your shopping list at Trader Joe's. I am always interested in hearing what else I need to look for there... leave a comment if you know of something I need to try! 


One of the favorite items that my family discovered in Trader Joe's is the pumpkin butter. It is a spread made out of pumpkin and spices, that is great on toast, English muffins, bagels, etc. My kids also love it in place on jam on their peanut butter sandwiches. I have used it to make a quick dessert (rolled into puff pastry and sliced into rounds before baking). It tastes like having a little bit of pumpkin pie with your morning coffee.


Trader Joe's only has the pumpkin butter available in the fall, and we used to stock up on about 10 jars of it when we found it on the shelves, in order to last us through to when it came back the following year.


And then I started to get the Abundant Harvest Organics box. In the AHO box, the fall brings pumpkins. And quite a few butternut squashes. And even a kabocha squash, which is something I had never heard of before. And, as it turns out, these three squashes can pretty much be substituted one for the other. They aren't exactly the same, of course, but they work the same way. The flavors are very slightly different, but I like them all. I have made "pumpkin" pie out of all three of them. I have made "pumpkin" cookies out of all three of them. And, to my great joy, I have found that I can make pumpkin butter out of all three of them as well. It is pretty easy to make, once you have pureed the squash. It just takes a few ingredients, and a little while standing at the stove, stirring and simmering.


A quick note about the kabocha squash... We got one in our box a few weeks ago, and it terrified me. It was big (the size of a medium pumpkin). It was ugly (a sort of odd green color). It was hard (hard like a gourd almost). I couldn't imagine that anything good would come of it. As a matter of fact, I added it to the fall porch decorations and left it there a couple of weeks, happily nesting amongst the pumpkins. But a friend assured me that her mother had gotten one in a CSA box in Colorado, and that she loved it. SO if a friend's out-of-state mother likes kabocha squash, who am I to turn up my nose? I brought in back inside, roasted it, pureed it, and became smitten. The kabocha squash is sweeter and more flavorful than pumpkin. It roasts into a wonderfully soft consistency, and the puree is amazingly smooth and creamy. As a matter of fact, give a choice between a pumpkin and a kabocha, I would now choose the kabocha every time. 


Anyway, I was sitting here with a pumpkin, a kabocha, and two large butternuts. That is a whole lot of squash. I roasted and pureed them all, and I made a kabocha pie and a pumpkin pie for Thanksgiving. However, I still had an immense amount of puree leftover. I combined it all and made "pumpkin" butter out of it. It made a whole bunch of pumpkin butter, so I was able to freeze several portions, and once again we will have enough to last us until squash season next year. 


I would say that this recipe works equally well for any one or any combination of these squashes. Use whatever you have on hand, or pick your favorite. Or, if you prefer, you can buy canned puree. About one large can of pumpkin is what is needed for this recipe.


Pumpkin Butter

         3 ½ cups pumpkin (or butternut or kabocha) puree
         3/4 cup apple juice
         1 1/2  teaspoons ground ginger
         1/2 teaspoon ground cloves
         1 1/2 cups white sugar
         2 teaspoons ground cinnamon
         1 teaspoon ground nutmeg

Combine squash puree, apple juice, spices, and sugar in a large saucepan; stir well. Bring mixture to a boil. Reduce heat, and simmer for 30 minutes or until thickened. Stir frequently. I am not sure about the acidity of this, so I can't recommend canning it. If you make a whole bunch, I suggest freezing it. It thaws quite nicely.


Thursday, October 13, 2011

Peanut Butter and Jelly Bars

A couple of weeks ago I mentioned some of the things I love, and some of the things I hate about being in the kitchen.

One of the things I love is fixing after school snacks for my kids. I only have one or two mornings that I am home alone while everyone is at school, but I try to use those days to have a little surprise treat for when the kids get back.


Here is a new recipe I tried the other day which was happily gobbled up by some hungry young scholars. Over the summer I had experimented with making some strawberry jam without added sugar. It didn't go over so well. I can't blame the kids, actually. The flavor was good, but the consistency was closer to apple sauce than to jam. Needless to say, the peanut butter and jam sandwiches weren't very much appreciated. As a matter of fact, they weren't very much consumed. (Heh... remember the part where I hate packing lunch boxes?).


Well, the no-added-sugar jam went into these bars, and as long as you promise not to tell my kids, they shall never be any the wiser. Of course, you can make these bars with any jam or jelly that you like best.

Peanut Butter and Jelly Bars
(from Family Fun Magazine)

2 1/2 cups flour
1/2 cup rolled oats
1 teaspoon baking powder
1/2 teaspoon cinamon
1 teaspoon salt
3/4 cup softened butter
1 cup sugar
1/2 cup brown sugar
1 teaspoon vanilla
2 eggs
2 cups peanut butter
1 1/2 cups jam

Preheat the oven to 350. Grease a 9x13 pan and set aside.

In a medium bowl, combine the flour, oats, baking powder, cinnamon and salt. In your mixer, combine the butter, sugar, and brown sugar. Mix on medium until well blended. Reduce the speed to low, and add the vanilla, eggs, and peanut butter. Slowly add the flour mixture and mix until it is all incorporated.

Spread about 2/3 of the mixture in the prepared baking dish. Spread the jam evenly on top of the dough. With the remaining dough, form mounds and place them in three rows of 8. This will allow you to cut 24 squares with one mound on top of each. Sprinkle any remaining crumbs evenly over the entire pan.

Bake it until is is golden brown, about 45 minutes. Let it cool, and then cut into squares to serve.

Wednesday, July 13, 2011

plum jam

I am really starting to hate big pots of boiling stuff. Especially big pots of boiling jam that is viscous and therefore clings to the back of your fingers and burns them when you spill some of it. And makes lots of blisters that continually get brushed against or bumped and make your eyes well up. And still there are piles of fruit that you can't just ignore.

Amongst other things. There are other things I hate too, but that is the main one for today.

But, onward! Forward march!

Today, it was plum jam. Despite the burns and the exhaustion, despite the sweat and the tears, plum jam is just so sweet and delicious.  It's worth it all.


Plum Jam
(This recipe makes about 8 1-pint jars)

Rinse, chop, and remove pits from about 4 pounds of plums. This is another recipe that works great for those really really ripe soft plums. Just squish them in half, and mush/pull/scrape as much fruit as you can from the pit. You can keep some skins and throw away some. Whichever skins separate easily from the flesh went into my composting bin. Those that stuck a little more carefully stayed in the pot. The skins contain the most tartness, so consider that in how many you want keep. Keep on pitting and chopping and squeezing until you have two quarts of plum bits.

Combine the plums, 6 cups of sugar, 1 1/2 cups of water, and 1/4 cup lemon juice in a large stockpot. Depending on how juicy your plums are, you may not need all of the water. It just needs to be liquidy enough to dissolve the sugar.

Cook, stirring constantly, until it reaches the jellying point (about 220 degrees at sea level). Just be careful. 220 degrees does not feel good spilled on your hand.

Here is that fabulous explanation for knowing when your jam is done.

When it is done, you are ready to can it for future use!

If you need to read about how to can, I suggest this document.

If you already know about canning, here is a chart for how long to process it:


Table 1. Recommended process time for Plum Jam in a boiling water canner.
 Process Time at Altitudes of
Style of PackJar Size0 - 1,000 ft1,001 - 6,000 ftAbove 6,000 ft
HotHalf-pints
or Pints
5 min1015


*This chart is from the National Center for Home Food Preservation. How official is that?

Tuesday, July 5, 2011

apricot jam

As I mentioned, I happen to have come across a whole big bunch of apricots. After making apricot syrup, I still found myself with almost a whole box of apricots... quickly heading south.

The next thing I decided to with some of them was to make apricot jam. Around here, with three kids who take a peanut butter sandwich to school every day, we go through lots of jam. Actually, I multiplied it out:

               3  kids
     X
                      180 school days
There is never going to be enough jam

So, it is always a good investment to stock the pantry full of jam while the fruit is ripe.

The last few batches of jam that I made included pectin, and so I decided to make a batch of jam without it this time. Why? Because the pectin method was working just fine for me. And if it ain't broke, there is a chance that I am going to break it very soon.

There is a very subtle difference between jam made with pectin and jam made without, but you would probably never be able to tell them apart. The main difference is how long you spend cooking it. Pectin makes it jell up right away, and so if you don't use it, you have to cook it for a long long time while the water evaporates and the fruit's natural pectin is released. You also don't have to remember to buy a package of pectin while you are at the market, or spend the $4-5 that it costs.

At any rate, I went for apricot jam sans pectin. Almost all fruits can be made into jam with just three ingredients: fruit, sugar, and lemon juice. This was no exception.


Apricot jam (makes about 8 half pint jars)

2 pounds of ripe apricots (about 20)
6 cups sugar (more or less, depending on how tart you like it. Mine has a tartness to it, but won't make your mouth pucker by any means) You can't go too much sweeter, though, without running into trouble getting it to set. 
1 tablespoon lemon juice


Wash apricots, slice in half, and remove pit. Chop into bite-sized chunks. There is no need to be precise here; it will all mush up in the long run.

Place the apricots into a large stockpot, along with sugar. Stir well to combine, and bring to a boil. (If the sugar isn't dissolving right away you can add a half-cup or so of water, but the fruit should be juicy enough). Add the lemon juice towards the end of the cooking process.

Let the apricots and sugar boil, stirring very frequently, until the jam is done. There are three ways to see if your jam is done:
1. Check the temperature with a candy thermometer. It should reach 220 degrees (218 if you live 1,000 feet above sea level like I do.)
2. Freezer plate test: Put a plate in the freezer for a few minutes. Pour a little bit of jam onto the plate and put it back in the freezer for a few minutes. If it "wrinkles" and holds its shape a bit when you push on it, it is done.
3. Scoop up a bit with a cold spoon and pour it back in the pot. If it isn't done, it will stream off of the spoon. If it is done, it will "sheet" off of the spoon.

Check out this great website that shows what a spoon looks like with jam "sheeting" off of it, as well as a chart for temperatures and elevations.

Once you have determined that the jam is done, let it cool for a couple of minutes. Skim off the foam that has accumulated on the top. (But save that foam! Tomorrow I'll give you a quick tip on how to enjoy a cocktail with your jam foam while the jars set.)

This jam will keep in the fridge for a few months... but try canning it! If you're like me, you don't have a ton of extra fridge space. And you are going to want to be able to eat this stuff all the way until next year's apricot season. Canning is much easier and less daunting that you think it is.  All you need is some jars, a big pot, and a pair of tongs.

Ladle into hot jars (The jars need to be hot so that the glass doesn't crack when the hot jam is poured in.) Fill each jar to 1/4 inch from the top. Wipe the edges of the jar clean. Place a lid on each jar, and screw on the band until it is finger-tip tight. Place the jars into a large pot of water, and boil for 30 minutes. (for higher elevations, check this chart for processing times). The water level needs to be 1-2 inches above the top of the jars. After 30 minutes, remove from the water using a jar lifter (or tongs). Let them sit, undisturbed for 12-24 hours. You will know if they are properly sealed if you press on the lid and it doesn't give at all.


Friday, June 24, 2011

With a cherry on top

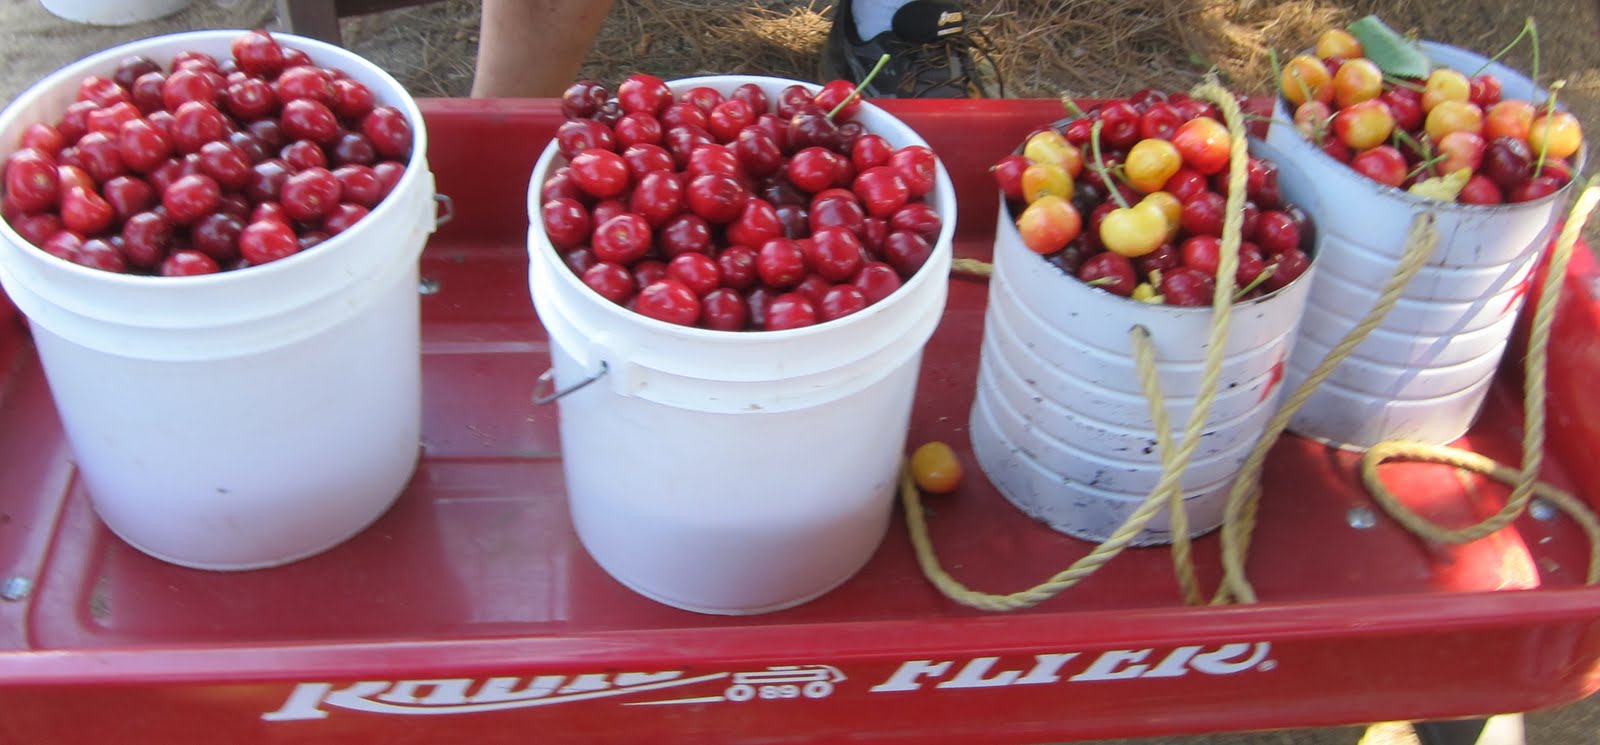
We all went cherry picking yesterday... 


As we loaded up the car to head out, my husband asked me "Which farm do you want to go to? And are they open today? At what time?" I answered, "I guess the same one we went to last time. I didn't check to see if they are open. It's June. They usually open every day in June. If they aren't open, I am sure there is a different farm that is." Clearly, I did no planning for this trip. 


It was a beautiful (but hot) morning in the Leona Valley, where there are more cherry farms than you can shake a stick at.


When we got to the farm, the farmer informed us that it was the last two days that the farm would be open, and that there are still plenty of cherries, but we would have to search for them. The bonus, of course, is that everything left is completely ripe. Heh. Good thing we didn't wait until next week! I guess my lack of planning panned out (this time).


Between my three kids, one extra friend, and my husband and I, I think we ended up with more than 20 pounds of cherries. I'm sort of glad we had to search for them. Imagine how many they would have picked if every branch had been loaded down, like it was last year!


My daughter and her friend went off on their own, reading the chart at the farm, locating the different types of cherry trees, and harvesting specific varieties. They climbed high up into the branches to pick their cherries, and filled their buckets up to overflowing.


My youngest son proclaimed himself to be in charge of the lowest branches. He walked around half-stooped, winding in and out of trunks to find the cherries that had been missed due to being directly underneath leaves and out of the line of sight of anyone over 4 feet tall.


My middle son went for volume. He filled a couple of buckets by looking for the trees that had the most cherries, and then getting to work all in one place.


So now I have the happy task of cherry cooking. As we drove home, we discussed what we will be doing with all of these cherries. We sounded a bit like Bubba Gump...


"Cherry pie... Cherry cobbler... cherry cheesecake... cherry jam... cherry vanilla shakes... cherry chocolate cake... cherry salsa..."


First up was some cherry jam. 


I am reading a book right now, "Animal, Vegetable, Miracle" by Barbara Kingsolver. I am planning to do a little review/recap when I finish reading it. For now, though, let me say that it is about the importance -- as well as the benefits and the obstacles -- of eating locally produced food. I was very excited to buy some local fruit, get it off the tree and made into jam all on the same day. It doesn't get much fresher than that!


Cherry Jam


4 cups cherries, washed, pitted and chopped up very finely
1/4 cup lemon juice
5 cups sugar
1 package pectin


Prepare the cherries. Combine the cherries and lemon juice, and slowly stir in the pectin. Place it on the stove, and bring to a full boil. Add the sugar, all at once, and stir to combine. Bring it back to a full boil, and cook for one more minute, stirring constantly. Remove from heat. Scrape the foam off the top. 


 Ladle into hot jars (The jars need to be hot so that the glass doesn't crack when the hot jam is poured in.) Fill each jar to 1/4 inch from the top. Wipe the edges of the jar clean. Place a lid on each jar, and screw on the band until it is finger-tip tight. Place the jars into a large pot of water, and boil for 10 minutes. (for higher elevations, check this chart for processing times). The water level needs to be 1-2 inches above the top of the jars. After 10 minutes, remove from the water using a jar lifter (or tongs). Let them sit, undisturbed for 12-24 hours. You will know if they are properly sealed if you press on the lid and it doesn't give at all.


This recipe makes 7 half-pint jars, plus a little extra for enjoying right away.

Tuesday, May 17, 2011

grapefruit marmalade

Sometimes I wonder how much I am eating the fresh produce each week, and how much I am just moving around, cooking, freezing, and canning to eat later. I feel like the little kid who keeps pushing food into new places on his plate so it will look like he has eaten something. I haven't thrown out any lately... barely. I have given some to friends in the form of dinners. I doled out quite a few jars of jam during teacher appreciation week. I have also fully stocked my freezer with lasagnas, casseroles, and potatoes. I think I will be glad to have these things when the long winter months bring me more and more squashes, turnips, and parsnips. It will be nice to open a jar of strawberry jam when the only fruit I have seen for weeks is an orange. It will make things easy when I can pull a veggie lasagna out of the freezer while my kids are staging a mid-winter cabbage revolution. But if we are eating the strawberry jam and veggie casseroles next January, who will eat the acorn squash and the beets? Am I going to end up with enough prepared food to feed an army, but only a family of three reluctant kids?

At any rate, for now I am having a blast canning my jams and marmalades. Let's leave the worrying about who is going to eat it all for another time.

This week, I got some big beautiful grapefruits in my box. I decided to try them out in a grapefruit marmalade.

The result is a delicious, slightly  bitter, beautiful orange-colored marmalade! I am so happy to have this on hand.

It is made much like an orange marmalade. However, unlike with oranges, you don't use the whole grapefruit. Because the pith is so much more plentiful and more bitter, it needs to be removed. This is done by first peeling the outer skin off with a vegetable peeler (to use),  and then peeling the inner pith layer by hand (to throw away).

Once you have your peeled zest, you chop it up very finely. Do this for both your grapefruits and a lemon. Then you cut the remaining fruit into smallish chunks, saving as much of the juice as you can. From here on out, it can be treated just like orange marmalade.

I made this recipe with 4 large grapefruits and one lemon.

First, combine the grapefruit zest, the chopped up fruit, reserved juice, and 5 cups of water. Bring it all to a boil and then remove from heat. While it is still hot, stir in 5 cups of sugar. Leave this all on the counter overnight, to soften the fruit and the zest.

The next day, return the pot to the stove and cook over medium heat. Stir it occasionally, and bring it to a boil that reaches 220 degrees on a candy thermometer. This will take at least half an hour.

When it reaches 220 degrees, remove from heat. Skim off any foam that has formed, and ladle into sterilized jars, leaving 1/4 inch head space. Wipe clean the rims and screw lids on until they are finger-tip tight.  Process the jars in boiling water for 10 minutes (15 minutes for altitudes above 1,000 feet and 20 minutes above 1500 feet). Remove jars from the boiling water and let them sit undisturbed for 12-24 hours. You will know if they are properly sealed if the lid doesn't give at all when you press on the center.

This makes 6 half-pint jars of delicious marmalade.

Friday, May 6, 2011

Strawberry Jam

There is an art to making food beautiful. Some people know how to arrange a plate just-so. They know how to combine colors and textures, portion sizes and ratios.  I have never been to any sort of culinary school... as a matter of fact, I haven't even taken a single cooking class (although I would LOVE TO). I believe, though, that there are courses just on plating the food. It is definitely an art form.

And then there are those who can bake beautiful creations. They not only bake a level, beautiful cake or cookies, they are then able to frost it smooth, without a wrinkle or drip. On top of that, they know how to make it beautiful, with just the right amount and combination of color, decoration, shape, texture. Those people are simply amazing, and occupy a space in my esteem where I will admire, but probably never aspire to join their class of artistry.

I was in Oxnard the other day. If you aren't from Southern California, let me give you a little background. Oxnard has traditionally been a manufacturing and agricultural center in California. Which means that it is largely populated by laborers from both factories and farms. In other words, its a working town, not a vacation destination. In the mid-2000's, the city decided to get ahold of its growing gang problem and invest in development. Suddenly, people began to notice that Oxnard, despite its name, is actually a beautiful location. It's hard not to be, only about 30 miles or so down the beach from Santa Barbara. Lately it has gained some beautiful neighborhoods and commercial areas, and is becoming a destination for relaxing beach weekends and wonderful retirement homes.

At any rate, there is still plenty of agriculture surrounding Oxnard, and it is considered to be the main supplier of strawberries and lima beans in the state of California. While I won't hold the lima beans against Oxnard, I will luxuriate in the strawberries.

It has been gloriously hot the past few days, and all of this early summertime means that the strawberries are ripe for the picking. I stopped at a farm stand to pick up a half-flat of the freshly ripened berries, and now I wish I had gone for the whole flat. After letting the kids have their fill, I made a batch of strawberry jam, and there are only a couple left! Oxnard is a bit too far for me to drive just to get berries, (I calculate that the 50 miles each way must take about $732 in current gas prices). 

I went ahead and made my jam using pectin. I know the world is divided into two types of people:
Those who add pectin to their jam, those who feel adding pectin isn't authentic, and those who buy their jam already made.  Pectin is a natural ingredient, derived from apples, that helps the jam to set, which decreases cooking time. The way I see it, using pectin isn't that different than using a stove hooked up to a gas line. Both methods have been developed since my great-grandmother made her jam, and both help out a lot in the kitchen. If it tastes good and helps with consistent results, I'm all for it.

We very much enjoyed strawberry jam on our toast this morning. And now you can too:

Strawberry Jam

5 cups of mashed strawberries (about 7 cups whole)
1/4 cup lemon juice
1 packet pectin (available in the grocery store right next to the mason jars and lids)
7 cups sugar

1. Rinse and hull the strawberries.

2. Using a potato masher, mash enough strawberries to make 5 cups.

3. Mix together the strawberries, lemon juice and pectin in a large pot. Bring it all to a rolling boil (so that even while stirring, the mixture boils). Add the sugar, and bring it back to a rolling boil.  Continue to boil for one minute, scraping off the foam.


4. Ladle into hot jars (The jars need to be hot so that the glass doesn't crack when the hot jam is poured in.) Fill each jar to 1/4 inch from the top. Wipe the edges of the jar clean. Place a lid on each jar, and screw on the band until it is finger-tip tight. Place the jars into a large pot of water, and boil for 15 minutes. The water level needs to be 1-2 inches above the top of the jars. After 15 minutes, remove from the water using a jar lifter (or tongs). Let them sit, undisturbed for 12-24 hours. You will know if they are properly sealed if you press on the lid and it doesn't give at all.


5 Enjoy your strawberry jam! If properly sealed, it should be good for up to a year.

Tuesday, April 5, 2011

a little jar of sunshine

A neighbor brought over some lemons that he harvested from a tree that hangs over into his yard.


Lots and lots of lemons. They look rather sunshine-y sitting on my counter.

However, I need my counter space back, and so I am going to try and get to the bottom of this yellow mountain. Where Discovery Channel has Shark Week, I plan to have Lemon Week. 

The first thing I decided to do was to make lemon curd. Since I have enough lemons to get the entire crews of the Nina, the Pinta, and the Santa Maria to the New World scurvy-free, I needed a recipe that would allow me to cook the lemons now, but eat them later. There will be plenty of lemon eating this week too, and I don't want the people around here mutiny-ing over lemons. 

Lemon curd is delicious and handy to have around. It makes a great gift. (So much so that Williams Sonoma sells a small jar for $14. Think of all the money you are saving by making this yourself.) You can serve it with scones or english muffins. You can use it to fill up little phyllo cups for a delicious finger-food dessert. You can use it to fill cupcakes or as an ingredient in cakes and cookies. Just don't use it to lose weight. With all the egg yolks, sugar, and butter you're about to cook, this ain't health food. 

To make the lemon curd, you will need about 5-6 lemons, enough to make a cup of lemon zest and a cup of lemon juice. These are pretty big lemons, and I used 4 of them.

My favorite method for zesting a lemon is to use a vegetable peeler. 


If I only need a little bit, I then chop the peeled pieces finely with a knife. Since I needed a whole cup this time, I pulsed all these lemon zest pieces in my food processor for a couple of seconds.

Next, mix your lemon zest with 2 1/2 cups of sugar, and set that aside for now. The sugar will absorb some moisture from the lemon zest, and it will turn all yummy and lemony.

Juice your lemons while you have them in hand. You will need a cup of juice. Pour it through a strainer, to get rid of any pulpy bits. 

Now, you are going to need a whole lot of eggs.


Eleven, to be exact. Your husband might wonder how he bought a dozen eggs at the morning farmers' market, only to find one lonely egg left in the afternoon. If he starts to say anything, just shove a spoonful of lemon curd in his mouth. There will be no complaining after that.

Separate 7 of the eggs. We need the yolks for this recipe. You can use the whites to make an omelet. Or you can toss them out. I won't judge. I made meringue cookies with mine. As for the other 4 eggs, you will use the whole shebang.

All of this is going to be cooked on a double boiler. If you have one.

If you don't, improvise.


Put your seven yolks and your four whole eggs into the top part of your boiler, but don't put it on the stove just yet.

Whisk together the eggs, then stir in the lemon juice, and then the lemon zest and sugar mixture. Finally, cut 3/4 cup of cold butter into pats, and put that in too.

Fill the pot that you are using as the base of the double boiler with about an inch of water. It is important that the bottom of the bowl doesn't touch the water below.

Bring that water to a boil, and then put your bowl on top.  Stir gently until the butter melts, the contents turn a beautiful lemony color, and the temperature of the curd is 170 degrees. When you hit 170, take it off the stove and stir for another 5 minutes, while it cools and thickens.

You can freeze it, can it, or use it up right away. It makes enough to fill five one-cup jars.


Tuesday, March 22, 2011

There goes two days of my life I'll never get back

--Or-- 
This stuff is worth its weight in gold.


I am a rule follower. If there is a form due on a certain day, I turn it in on or before that day. I don't ask if I can have an extension. If there are certain requirements for a project, I don't stop until I have completed all of the requirements. I don't pick and choose. I don't opt to skip part of it. I don't talk on my cell phone while I drive, and I always press the button on the crosswalk.

So imagine my disappointment when I followed all of the directions for a new recipe, and it just didn't work out. Not just any recipe, mind you. One that took two. days. to. cook.

Don't worry... there is a happy ending here. But I am not going to let you hear it just yet. Come, suffer with me!

As I have mentioned, my weekly box of produce comes with a newsletter. In addition to some information about being green and sustaining the earth, there is usually some hints as how to use the less common items in the box (how else would I have known that I have to eat the beet greens and not just throw them out?). Also, every week, there is a recipe or two.

I hadn't used any of the recipes until this week, since they haven't quite worked out with my needs. However, this time the recipe for orange marmalade struck me as sounding kind of fun.

I have been wanting to try canning some of the fruits and veggies. I wonder if it is at all possible that I may actually miss some of the things that are overwhelming me right now, once they are out of season. It could be that I will wish I had them back!

This week, the newsletter contained a recipe for collared greens (Which, ironically are not in the box this week), and a recipe for orange marmalade. I happen to love orange marmalade, so making it seemed like a great way to use up some of the many oranges, try out canning for the first time, and perhaps even have a gift for a friend.

I followed the rules. Both the recipe instructions, and the instructions printed on the box of brand-spanking-new mason jars I bought just for this project.

I chose 5 oranges and 2 lemons. I sliced them in half, cut them into thin strips, and placed them in a pot with water.


why oh why won't these pictures line up nicely?


Then I began to cook them...  According to this recipe, you bring it all to a boil, add sugar, and then let it sit overnight. On day two, you bring it back to a boil, simmer for two hours, and then boil again for a half an hour.


I did all that. I boiled, then simmered, then boiled. I stood by the stove for almost three hours, stirring, watching, scraping foam from the top.

Then, it was time to do the canning. First, I boiled the empty jars to sanitize them. Then, I carefully filled each jar up to 1/4 inch from the top. I put the lid on,  just so tight, and stood by the stove some more, so I could boil it again. 


These jars of marmalade came out beautiful! 


And not at all like marmalade! The dang stuff didn't set. It stayed like runny orange and lemon slices floating in sugary water. Which, it just so happens, is exactly what it is! 

I was ready to give up and rename it "Orange ice cream topping" ... or "Orange pancake syrup"... or "Garbage."

However, I decided to consult my friend Google. He told me that the recipe I used was more or less the same as every other marmalade recipe. He also told me that it needed to boil about half an hour... until it reaches 220 degrees. Well, that little piece of info made all the difference. That little piece of information and a couple more hours in the kitchen.

I unsealed my perfectly preserved jars, poured the stuff back in the pot, stood and stirred and scraped and boiled it for much longer than half an hour, until 220 degrees,  and then did the little refrigerator-plate-test that was suggested in one recipe. Voila! Marmalade! Finally!

Okay, ready, set go: Rewash jars. Put jars back in the boiling water to sanitize. Fill jars back up, tighten the lid just so, put them back in the boiling water to preserve. Boil 15 more minutes, check the lids again, and we're done ... just as soon as I wash all these pots, pans, spoons, ladles, thermometer, knives, etc. And wipe sticky orange goo off of every surface in a 20 foot radius.

Good night!

Here is the recipe that actually works:
Orange marmalade

4 large oranges
2 lemons
8 cups sugar

Cut the oranges and lemons in half crosswise, then into very thin half-moon slices. Discard any seeds. Place the sliced fruit and their juices into a stainless-steel pot. Add 8 cups water and bring the mixture to a boil, stirring often. Remove from the heat and stir in the sugar until it dissolves. Cover and allow to stand overnight at room temperature.
The next day, bring the mixture back to a boil. Reduce the heat to low and simmer uncovered for about 2 hours. Turn the heat up to medium and boil gently, stirring often, for another 30 minutes. Skim off any foam that forms on the top. Cook the marmalade until it reaches 220 degrees F. If you want to be doubly sure it's ready, place a small amount on a plate and refrigerate it until it's cool but not cold. If it's firm -- neither runny nor too hard -- it's done. It will be a golden orange color. (If the marmalade is runny, continue cooking it and if it's too hard, add more water.)
Pour the marmalade into clean, hot Mason jars. if you plan to store it, be sure to seal it in boiling water.