New Here? Read The Story behind the Box

Showing posts with label appetizer. Show all posts

Wednesday, May 2, 2012

Radish Dip from Martha Stewart

Don't you hate those awkward conversations you have to have once in a while when you are stuck for what feels like an eternity? Say, for example, you are waiting for your son to be released from school, and your good friend sends her husband to school. You've met the guy a few times but you don't really know him, and now you're stuck for 6 minutes staring at a closed classroom door struggling for things to say.

How 'bout them Dodgers? And the weather's nice, eh?

Don't think I'm being awkward, but how about that weather? I don't know what it's like for you right now, but lately my little corner of Southern California is not acting at all like Southern California. We are supposed to get 4 inches of rain over the winter, and then a couple months of glorious days in the 70s and 80s and then a hot summer. In precisely that order. We don't flip flop between seasons. We don't go back to rainy days after they are done and spring has come.

But these days the weather is acting like... like... like the midwest. I love the midwest, I do. Despite growing up in Sunny paradise here, most of my childhood memories (and certainly my best memories) are from my summers in Green Bay. It's just that since small neighborhood houses here sell for close to a million dollars, you ought to get sunshine with your mortgage payment. Every day.

The past month had been kooky. One day it's raining, the next it's sunny and hot. Then back to overcast and cold. We even had... ugh... humidity. One Friday I was running, with my hood up, through the pouring rain to my daughter's classroom. The next Friday, at the exact same time, I was walking there in a sundress, trying to find ways to distract myself and stay in the sunshine for just a few seconds longer.

So, we are making the best of it and trying to stay outside every second we can to soak up the sun on the days it is here.  Which means that my kindergartner has gotten to go swimming with some of his buddies during the precious hours between kindergarten dismissal at noon and the big kids coming home at 2:30 or more than a couple of occasions. It's good to be the baby of the family, isn't it? And hey, we have to make hay while the sun shines. (Clearly that is an expression written somewhere other than here.)

Lazy days at the pool mean snacks and drinks and more snacks. Those kids parents can work up an appetite while they swim watch people swim!


I found this recipe for radish dip in Martha Stewart Magazine this month. It's yummy and easy to throw together. It tastes even better the day after you make it (when the ingredients have had time to meld). Stir together a batch of dip, and then bring it along with some pita chips or baguette slices to your picnic. Or pool day. Or happy hour party (It's fancy enough for that if you want it to be!). Or, skip the carbs and serve it with fresh snap peas and carrot sticks. After all, you want to look good poolside!


Radish Dip
Martha's recipe makes enough to serve quite a crowd. I cut everything in half and still had plenty.

1 pound radishes (about 25), julienned
1 1/4 cups sour cream
3 ounces feta cheese, crumbled (about 3 cups)
1 teaspoon finely grated lemon zest, plus 3 tablespoons lemon juice (from two lemons)
1 1/2 teaspoons coarse salt
1/3 cup chopped fresh dill

crackers or toast or raw veggies for serving

Combine all the ingredients and chill until ready to serve.

This post is linked to A Little Nosh

Wednesday, March 28, 2012

Asparagus Pesto

I have to admit, I am a fool for anything with the name pesto in it. I adore basil (as much as any person can adore an herb), and by the time you add some garlic to it, I am in flavor heaven.

I also happen to be a fool for asparagus. I was thrilled to see it it my Abundant Harvest Box this week. I have read that there are many cultures who see the first asparagus as the official start to spring, and hold festivals to celebrate its arrival. I totally get it.

When two worlds collide, and I see a veggie I love and a recipe that intrigues me on the same day, I know the vegetable gods are asking that I make it. Who am I to defy the gods?


This pesto is everything I hoped for. The salty, garlic-y, basil-y nutty flavors were perfect. It's not a sauce so much as a paste, and it seems perfect for spreading on crackers or crostini for an appetizer, or with chicken, pork, or fish for a delicious main dish. If you wanted to toss it with pasta I would recommend adding a bit more oil, and letting it puree finer. I served it with chicken breasts that I grilled. A big salad and some fresh strawberries and orange slices, and it was a perfect spring dinner.


Asparagus Pesto
(Adapted from here)

one pound asparagus, tough ends trimmed
3 cloves garlic
1/4 cup cashews
3/4 cup fresh basil leaves, packed
1 teaspoon salt
1 tablespoon olive oil
1/2 teaspoon fresh ground pepper

First, steam the asparagus until tender. I used a microwave steamer that I love for its handiness, but you can do it on the stovetop as well. Set aside to cool.

In a food processor, whir the garlic cloves until they are chopped pretty finely. (This way no big chunks will be left to overpower any one mouthful). Add the remaining ingredients, and pulse until they are all chopped finely and mixed well, but not pureed into a sauce. You want some bite to it.

That's it! Serve it with your favorite accompaniment!


Thursday, March 15, 2012

Irish Nachos

What with St. Paddy's Day right around the corner, I decided to combine two of my favorite things: My wee bit of Irish heritage and guacamole.


I have had Irish nachos in pubs and restaurants, and I've made them at home many times. The concept (if you've never been so lucky as to enjoy the experience) is simple... Take all that is amazing about a plate of fully loaded nachos (sour cream, guacamole, cheese, onions, meat) and put it on potatoes instead of tortilla chips. The potatoes aren't as conveniently scoop able and finger-food-ish as the chips are, but on the other hand they are quite a bit more filling and help to justify using this appetizer-y, snack-y food as a meal.


Ha! As if I felt a need to justify eating this for dinner! It's damn delicious and much preferable to may other things I've eaten for dinner. That's good enough for me.

I have seen many recipes and suggestions for how to build your Irish Nachos. I think the best I have seen is Gaby's at What's Gaby Cooking. I used her recipe, with a few additions (sour cream!), and a couple substitutions (beef instead of turkey... I mean, Irish is Irish!). Really, Gaby is adorable and her recipes are delicious, and her photography is amazing. You should check out her original post and everything else she is cooking. But be prepared to find yourself suddenly starving.

Here is my version of Gaby's Irish Nachos:

2 russet potatoes, skin on
1 red bell pepper, cut into bite-sized pieces
1 yellow bell pepper, cut into bite-sized pieces
1 smallish onion, cut into bite-sized pieces
1 pound ground beef
salt and pepper
2 teaspoons paprika
2 teaspoons olive oil
1 cup cheddar cheese
1/2 cup salsa (I used the salsa I canned last summer, you can use the kind you love best)
1/2 cup sour cream
guacamole (the more, the better, in my book)

Preheat the oven to 350. Slice the potatoes and layer them in a pie plate or similar-sized baking dish. Sprinkle them with one teaspoon of the paprika, salt and pepper. Then drizzle it all with olive oil and bake it for 35 minutes.


While the potatoes are in the oven, slice the bell peppers and onion. Sauté them in a pan over medium heat for about 10 minutes. You want them to be softened a bit, but still something to bite into. Turn them out onto a plate and then brown the beef in the same pan, with the remaining teaspoon of paprika and some more salt and pepper.

When the potatoes are done, layer them with the vegetables.


And then the beef.


Spread the cheese over all of this, and pop it back in the oven for a few minutes, until the cheese melts.

Top it with salsa, sour cream, and guacamole.


And enjoy the best thing that ever came out of the old world's invasion discovery of the new world. So good, in fact, my husband said "Would you stop taking pictures of that and please let me eat it? I can't wait any longer!" So, I never got the shot I was looking for, but my belly never complained.


This post is linked to the Improv Challenge hosted by Kristen at Frugal Antics of  Harried Homemaker. Check out what everyone else did with potatoes and cheese!


Improv Challenge


Tuesday, October 11, 2011

zucchini and herbed ricotta torte

A few weeks ago I made a hummus and roasted vegetable torte that just rocked my world.  Actually, it was the simple, four-ingredient, flaky delicious crust from Soma at ecurry that was the world-rocking part.

And so, on meatless Monday yesterday, at about 4:45, when I had no idea what to make for dinner, I remembered Soma's awesome torte crust. Luckily I had all the ingredients on hand, and away I went!

After making the crust (this time with rosemary), I went about loading it up with the vegetables that are still lingering from last week's box. Ahem. That is to say that this week I am somehow faced with catching up on all the stuff we somehow didn't get around to eating last week, and at the same time tackling this week's bounty. I am not sure how this is all going to work out, but I guess there are worse problems in the world than having too much delicious, fresh, organic produce on hand.

Back to 4:45 yesterday. With my crust safely baking in the oven, I had 12 minutes of free time to figure out how to top it. We have no hummus on hand right now, but while rooting around in the fridge I found some ricotta. Perfect! Mixing the ricotta with some fresh herbs gave it plenty of zip, and topping it with a couple of the veggies I needed to attend to made it perfectly tasty. Again, I think it would make a perfect appetizer, cut into  small squares. However, though, this time it was the main course here, served alongside a big salad.

And so, I give to you, my zucchini, tomato, and herbed ricotta cheese torte!


2 cups all-purpose flour
1 teaspoon salt
freshly ground black pepper
1 teaspoon fresh rosemary (or any other herbs you have on hand)
1/3 cup + 2 1/2 tablespoons olive oil
1/4 cup + 1 1/2 tablespoons very cold club soda
1 cup ricotta cheese
1/4 cup basil leaves, cut into thin slivers
2 tablespoons chives, chopped finely
2 garlic cloves, minced
1 medium zucchini
about 12-14 cherry tomatoes
crushed red pepper flakes
salt and pepper to taste

Preheat the oven to 400 degrees.

Mix the flour, salt, pepper and herbs together. In a separate small bowl, whisk the club soda and olive oil for a couple minutes, until they become creamy and well incorporated.

Pour water-oil mixture into the flour mixture, and combine with a fork just until there is no dry flour left. Using your hands, form the dough into a ball.

Divide the dough into two pieces and roll each one separately. Place the dough between two pieces of parchment paper, and roll in only one direction (not back and forth). Last time I did it, I went for a rectangle. This time, I let it take on the shape it wanted... a sort of loose oval.

Bake it for 12 minutes, until the crust is starting to become golden.

While it is baking, prepare the toppings:
First, mix the ricotta with the garlic, chives, and basil, and set aside.
Using a vegetable peeler (I used my new y-shaped peeler. For $4.99, it is giving me a whole new happy life in the kitchen! Why didn't I invest in this baby sooner?), cut the zucchini into thin ribbons. Cut the cherry tomatoes in half.

When the crusts are done, remove it from the oven and let it sit for a few minutes to cool a little bit.

Spread the ricotta mixture evenly over both crusts.

Spread the zucchini strips in an overlapping layer over the torts, and sprinkle with the crushed red pepper, salt and pepper. Place it back in the oven for about 10 minutes, until the zucchini starts to soften.

When it comes out of the oven, top it with the tomatoes, and cut into pieces.


Friday, September 23, 2011

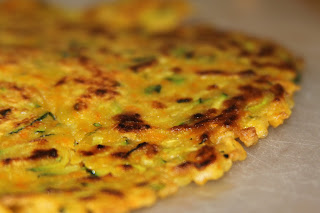
Hobak Jeon (Korean zucchini pancakes)

While looking for a recipe to use summer's last zucchini, I stumbled across Hobak Jeon. In Korean food, Jeon (pancakes) are very common, and can be made with a number of different vegetables or meats. These are made with zucchini (hobak).

So often, when I find a recipe that sounds good, I get started cooking right away. I usually make changes here and there, adding a little extra of the things I like, omitting or lessening the things I don't like, and often substituting things I have on hand for things that might require a trip to yet another store.

This time, though, I feel like I deserve a gold star. I actually read through several different recipes ... and even watched a couple of videos for these pancakes before I got started.

I still made substitutions and changes here and there, but I did so with some reasons this time. I went with a piece of this recipe and a bit of that one, as they appealed to me for different reasons.

Most recipes for these Hobak Jeon were very similar... they all called for an equal amount of flour and water, 1 egg for every cup of each of those, and the zucchini.  However, I liked the way Ellie Won at Kitchen Wench made fewer, larger pancakes to cut into pieces and serve as appetizers. They just look much much cooler that way. Also, she was the only one I saw who added carrots, so I went ahead and put some in mine too. In general, she was just so very much more hip than many of the websites highlighting hobak jeon.


If you want a very authentic set of instructions, you can go to Aeri's Kitchen. She provides a video with step-by-step instructions, and has some awesome Korean background music.

Almost all of the recipes called for cutting the zucchini into matchsticks, but I went the easy route and send them through the shredding blade on my food processor. I can't imagine it made much difference.

Enough about all that. Here's the dang recipe.

Hobak Jeon

2 large (or 4-5 small) zucchini
about 2 teaspoons salt
2 cups flour
2 eggs
2 cups water
2 carrots
1/2 onion
salt and pepper to taste
olive oil

First, shred the zucchini int the food processor. Take it out, toss it with the salt, and place it into a colander in the sink. The salt will draw out the moisture, and the colander will let it all drain away. Leave it for about 30 minutes.


Meanwhile, beat the eggs with a whisk to get them fluffy. Add the flour. Adding two cups of flour to two eggs makes for a very dry, very odd mixture. Just do your best to get the eggs spread out in the flour. Next, add the water, one cup at a time. Mix it thoroughly in between cups, so the flour and egg is evenly distributed. You want to end up with a very thin pancake batter.

In the food processor, take out the shredding disc and put in the blade. Pulse the carrots and onions together until they are very finely minced.

Once the zucchini has softened and lost some of its juice, squeeze it thoroughly (to make it as dry as possible) with your hands. Add the zucchini, carrot, and onion to the batter. Add salt and pepper.

Heat a frying pan to medium heat and add about a teaspoon oil.

Pour about 3/4 cup of batter into the pan. Using the back of a spoon, spread it to the edges of the pan. You want the pancake to be very very thin.


Let it cook until it is looking dry and it is getting brown on the bottom. Carefully turn it over, and let it cook until the other side is golden brown also.

Repeat until the batter is gone. It should make 7-8 large, thin pancakes. You might need to add more oil every so often.


Serve, cut into pieces, with a dip made by combining a little soy sauce and vinegar.

Wednesday, August 31, 2011

garlic chive pesto

Before we begin, a little disclaimer:

I can't endorse you trying this recipe unless you promise to first make sure you have some breath mints handy. With all of its oniony, garlicy goodness, you won't make any new friends after you eat it.

Unless you invite them to eat some too. In which case, they will most likely find it so compellingly delicious that they become your best best friend forever.


This pesto had a little more bite to it than traditional basil pesto... and a little bit more complex flavor. It goes well with chicken (or fish, I suppose), pasta, or spread on a sandwich. This time around, I tried to imitate an appetizer I had at the very trendy Pizza Mozza in Hollywood -- served with crackers and ricotta cheese. Absolute heaven.


This is my own version of a few different recipes for chive pesto I found online. They are all more or less the same (chives, garlic, olive oil, nuts, cheese).

I'll give you the recipe the way I did it:

Garlic Chive Pesto

1/2 - 1 cup chopped garlic chives
1/4 cup parsley
3 tablespoons cashews
3 tablespoons parmesan cheese
1 large clove of garlic
4-5 tablespoons olive oil

Place the chives, parsley, cashews, garlic, and cheese into a food processor. Pulse until it is all mixed up and uniformly minced. Add the olive oil (enough to reach your preferred consistency), gradually as you continue pulsing.

Store it with a tiny bit of olive oil poured over the top, to help keep that beautiful bright green color.

Thursday, August 4, 2011

Spring Rolls

After driving halfway up California's Great Central Valley, and visiting Peterson Family Farm, we arrived at our campground.

AAAAHHHHH.

I love camping. I was trying to figure out why it seems so relaxing, when in reality many things are more difficult while camping. For example, washing dishes:

At home, I load the dishwasher (theoretically I do this as I create dirty dishes), pop in the detergent, and press "start."

While camping, I walk to the water spout to fill a dishpan. Then I walk back to fill a large pot. I place the pot onto the stove to heat the water. Once it boils, I divide the cold water and the hot water so that I end up with two pans of very warm water. One gets soap, the other is for rinsing. Then, I scrub each item in the first pan, transfer it to the rinse pan, and then place it into a drying rack. When they are all done, I have to throw the water out, place the dish rack into one pan, and invert the other pan over it all, in order to keep it dust-free.

Really, being at home is much easier, right?

Well, except.

At a campground, I have no floors to sweep, mop, or vaccuum. I have no beds to make (unless you count throwing the sleeping bag back to it's proper side of the tent). I have no washing machine or dryer to run. I have no windows to wash, furniture to dust, or showers to scrub. I also have no appointments to keep, errands to run, or practices and classes to shuttle kids to and from.

It's lovely.

As I mentioned, eons ago, we grabbed our Abundant Harvest box on the way to the campground. Meaning that there were all sorts of yummy fruits and veggies to consume during the week. Fortunately, we also had friends and family there to share in the harvest.


One fun use for many veggies was spring rolls. This was actually my mom's idea, and she got my kids and their friends involved right alongside the adults, in making this delicious appetizer.


They are super nutritious (all sorts of raw vegetables) and easy to make (very little actual cooking). Once the chopping was done, the kids pretty much took over, and the adults got busy eating the spring rolls as quickly as the kids could build them.


Spring Rolls

First, you need to buy spring roll wrappers. I have only seen them at Asian Markets.


It is an extra errand to run, but as you can see, they are certainly reasonably priced! This package didn't say how many it contains, and they were being eaten faster than I can count. However, I'd be willing to bet that for $1.49, we made at least 80 spring rolls.


Spring roll wrappers are made out of rice flour, water and salt. They are rolled out to be extremely thin, and then dried on bamboo mats.


They are almost transparent and completely dry (almost fragile) when you take them out of the package. After dipping them into warm water for a half-minute or so, they become pliable.


The other specialty ingredient is rice noodles. These can probably be found in any supermarket, but you will find them for a ridiculously low price if you get them at the Asian Market while you are picking up your spring roll wrappers. Cook the noodles according to the directions on the package. (Pretty much like cooking any pasta, but way faster). This is the only cooking you have to do.

Now, chop up your veggies. They should be chopped into match sticks. I used (of course) the stuff I had on hand, but any combo is bound to be good. I had carrots, basil, bell peppers (red and yellow), summer squash, lettuce, and cilantro. You could add almost anything. Some things that come to mind are bean sprouts, cucumber, celery, mushrooms, or radishes.


Once you have assembled your supplies (wrappers, cooked noodles, chopped veggies), you can begin rolling.

Take a wrapper, and submerge it in warm water until it is soft enough to fold without cracking (20-30 seconds). Lay it out and begin piling ingredients onto one side of it. Remember that it is small and needs to roll up, so go easy on the filling! A couple of pieces of each veggie, and bit of noodles is all it takes.

This one is filled very generously!
Once you have gotten all the good stuff on there, roll it and tuck the ends in as you go. (Like a burrito).


Since we had a whole group of rollers (ranging in age from 7 to... shall we say... adults?), we ended up with a whole range of rolling styles. Some were perfectly done.


Others looked a little more... creative.


But all of them were delicious!

Ordinarily, I would love to artfully display a platter-ful.
This time, though, I had to snap quickly. These hungry
campers weren't waiting to eat them! I don't think we ever had
more than four on the plate at any one time.


Once they are rolled, dip them in the most delicious dipping sauce ever. 

1 cup hoisin sauce
1 Tablespoon peanut butter
1 teaspoon rice vinegar
1/4 cup chopped peanuts

Mix together hoisin sauce, peanut butter and vinegar. If it seems too thick, you can stir in a little water. Top with chopped peanuts.


Friday, July 1, 2011

cherry salsa

About a year ago, we moved out of the first house we had ever owned as adults, and into the nest that I hope will carry us at least until we empty it of children. We only moved about a mile, and we moved into a very similar neighborhood. We loved the house we had; we had upgraded and redone just about every square inch of flooring and walls in the joint to be exactly what we wanted. We simply had run out of room in that little house that had seemed spacious when we bought is as newlyweds, and was nothing short of cramped for a family of five.

I think, though, the hardest part of moving wasn't that I was going to miss the custom fireplace my husband built. It wasn't how much I thought the spanish tile floors that were installed (while we all camped out on mattresses in the living room) were perfect and could never be matched. It wasn't even the stripes I had painted in the dining room when I was nine months pregnant (someone else had to come back and get the bottom 18 inches of each wall because my belly got in my way). I brought all these memories with me. What I couldn't bring were the neighbors.

Directly across the street from us were the best neighbors anyone could ever hope for. Our first kids were about a year apart in age, and you never met such compatible souls. We were pregnant together and delivered our second kids within a month of each other. We had backyard barbeques on the weekends, we traded walking the kids to school in the mornings, and the two of us moms established Tuesday "wine nights" because that was the night our husbands both worked late. A bottle of wine and a salad, a tray of chicken nuggets, and suddenly we hoped for more late nights at the office.

Of course, we are still friends with our old neighbors. But it's a little different. I don't borrow a cup of sugar from her anymore, and barbecues need to be scheduled ahead of time. Still, though, friends like these are worth hanging on to, worth scheduling into our lives, and (I can only hope) will be here long after we empty this nest of children.


Cherry Salsa

This sweet salsa has a bit of a kick to it too. I chopped the cherries in half to garnish chicken, but you could easily chop them into smaller pieces and use it to dip your chips. If you want it milder, just use a small part of the jalapeno pepper.

4 cups cherries, pitted and chopped
1 cup chopped cilantro
1 jalapeno pepper (seeds and ribs removed), minced
6 green onions, chopped (white and green parts)
1 clove garlic, minced
1/4 cup lemon juice

Chop it all up and stir to combine. Make this at least a couple of hours ahead of time (or in the morning, if possible), so the flavors have a chance to meld.

Monday, June 20, 2011

back to the basics

I'm gone for a long weekend, enjoying my little brother's wedding to a great gal.

Just thought I would leave a picture to remind you to enjoy life's simple pleasures.


Maybe when I get back I'll report to you on some new delicacy I tried while dining out three meals a day.

Or maybe I'll come refreshed and ready to try some great new recipes.

Or maybe I'll never come back... you can try looking for me by the pool. I'll be the one with a margarita in her hand.

Caprese Salad

Layer slices of tomato, fresh mozarella, and basil leaves on a plate. Drizzle with olive oil, and enjoy.

That there is the taste of summer.

Thursday, May 5, 2011

It's eight o'clock somewhere

When I was a little tyke I hated going to bed at night, much like every little kid does. I was pretty much convinced that the minute my light was off, my parents were going to scoop some ice cream and enjoy it in front of the TV. As a matter of fact, I believe that the minute my light was off, my parents did enjoy a bowl of ice cream and some TV shows I wasn't supposed to watch.

The other day, as I was tucking my own kiddos into bed, my five-year-old said, "After I go to bed and you go downstairs to do your sweeping, will you try to find my baseball hat?" I am not sure why he thinks I run off to do some secretive pleasure sweeping at night, but I am not about to set the record straight.

Can you keep a secret? My evenings look more like this:


The best guacamole ever

2 avocados
1-2 Tbsp. fresh lemon juice
2 green garlics, sliced thinly (Is that how you pluralize it? I would say green onions, so I guess it is right. It just sounds funny.)
2 Tbsp. fresh chives, sliced thinly
A handful of fresh cilantro, chopped up real small
salt and pepper to taste.

Just mash the avocados, stir in the rest, and get ready to dip your chips. Or your spoon.

Monday, April 25, 2011

You be the judge

I can't decide if the appetizer I made the other day is a white trash food or not. One could argue that the fact that I am questioning this is proof enough, but I want to take a poll before deciding.

On the one hand, it does contain fresh, seasonal produce (Not white trash)


Is your head tilting to the side? I didn't realize I take all my pictures at the same angle!


On the other hand, it also contains white bread. With the crusts cut off. (SO white trash)

Back on the first hand, it also involves making an herb-infused butter (not white trash).

But, back on the other hand, it also contains big chunks of cheddar cheese (pretty trashy)

This recipe came from Sunset Magazine (not trashy) and was clipped out by my mother (also not trashy). In March of 1978. Oh yes, 37 years ago. While 1978 was a fabulous year for new things (like little baby girls), it wasn't a good year for recipes that take into account cholesterol, fat, processed sugars, or carbohydrates. (Does that make it trashy or not? I can't decide. On the one hand, great year. On the other hand, not so healthy. But on the other, other hand, they didn't know any better. It's not their fault).

At any rate, let's take this Sunset recipe, these herbs and vegetables, and this white bread, and make a delicious appetizer. As long as you don't think about what exactly you are consuming, you will thoroughly enjoy it.

First, we need herbed butter. Dice enough cilantro to make 1 tablespoon. Slice thinly enough green onion (or in my case, spring red onion) to make 3 tablespoons. Also, measure out 1/2 teaspoon dill. Mix these herbs, along with salt and pepper to taste, into 1/2 cup softened butter.

Next, we will assemble the rest of the ingredients:

Trim and blanch a bunch of asparagus stalks. Count out a slice of bread for each stalk of asparagus (I did 18). Trim the crusts off of the bread. Cut sharp cheddar cheese into sticks that are about 3 inches long, and 1/4 inch in diameter.

Now, we'll begin to build our roll-ups. 

Take a slice of bread, and flatten it with a rolling pin. Spread evenly with butter mixture.


Place a spear of asparagus and a stick of cheese onto the bread.


Roll it up, and secure with a toothpick. Once you have finished all of the rolls, melt a1/4 cup of butter, and brush over all of the rolls.


Place them in the oven broiler, about 5 inches from the heat source. Let them toast for about 5 minutes, and enjoy!


Here is the recipe in a more concise manner:
about 18 asparagus spears
6-8 ounces of sharp cheddar
1 loaf of white bread
3/4 cup soft butter
1 T. chopped cilantro
1/2 t. dill
3 T. sliced green onion or spring onion

Clean, cook, and drain asparagus spears. Cut cheese into sticks that are 3 inches long and 1/4 inch diameter. Trim crusts from 18 slices of bread and flatten each with a rolling pin. Combine 1/2 cup of the butter with the cilantro, dill, onion, and salt and pepper to taste. Spread evenly over one side of the bread slices, and top each with an asparagus spear and cheese stick. Roll each slice, secure with a toothpick, and place on a baking sheet. Melt remaining 1/4 cup of butter and brush evenly over rolls. Broil 5 inches from the heat source, for about 5 minutes, until golden.

Friday, March 11, 2011

Onion torte


Of course, I selected this recipe with the objective of using some of the onions in the house. Another valid reason is that it is delicious! And easy.

I am adapting this recipe, but I changed it so much it only vaguely resembles the original.

First, thinly slice two onions. I used white onions, because that is what I had on hand. You can use virtually any kind you want. They all cook up nicely and caramelize into a sweet, soft, yummy mess.


Next, heat a little oil over medium heat, and saute the onions, stirring often. You will need to cook them.


And cook them.


And cook them, until they are a nice golden brown color. No matter what color they started, this is the color they will end up.


Stir in salt and pepper to taste.

At this point, you can wait as long as you want, before moving on. This is helpful if you don't want the house to smell so oniony when your guests arrive. Cook the onions in the morning, and assemble and bake right before your party!

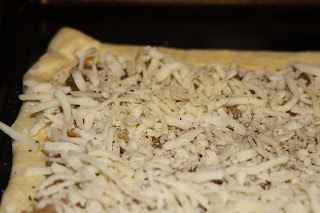
Next, thaw a sheet of puff pastry. This will need to thaw about half an hour on the kitchen counter. Brush water on the edges, and fold all four sides in, to create a little crust around the edges.


Spread your onions across the pastry, and cover it all with about a cup and half of grated mozzarella cheese. Sprinkle black pepper to taste over it all. I personally like a pretty good amount of pepper. It balances nicely and adds some interest to the sweet onions.


Bake it all at 400 degrees, for 20 minutes. The pastry and the cheese will turn golden brown and it will all puff up impressively.


Cool it on a wire rack for a few minutes, cut into squares, and serve! It is good warm or cold.