New Here? Read The Story behind the Box

Showing posts with label sauces and syrups. Show all posts

Tuesday, February 28, 2012

Veggie Scraps Pasta Sauce

Basically Free Pasta Sauce
--or--
Making Something From Nothing
-or--
You can eat that?

I just couldn't decide what to call this post. 

The very last thing I did with my week of roasted vegetables was to make a sauce out of the scraps. In An Everlasting Meal, she calls it a pesto, but I didn't think it was quite tangy enough to fit the connotation of a pesto.

It is indeed a delicious sauce, and it is indeed made from scraps. The parts of the vegetable that I have always thrown away became the basis for this sauce, and therefore the inspiration for dinner. 

As I prepped my vegetables, I kept aside those things I ordinarily toss in the compost bin. The leaves from the broccoli and cauliflower, the cauliflower core, the tough ends of the broccoli stalks, the chard stems, and the tiny little cores from the brussels sprouts all went into my cooking pot.

I chopped everything into smallish cubes and put them in a pot, just barely covered with water. To that, I added a few whole garlic cloves and a tiny little bit of salt.

Bring it to just under a boil, and let it simmer a good long time, until everything is tender enough to easily smash with a fork. This takes a good half hour at least, so it is a good thing to do while you are cooking something else. I let this pot simmer the same evening I was making the risotto. The cooked veggies will then keep in the fridge another couple of days, so you can be making two dinners at once!

Once everything is cooked through, puree it all in a blender with a good dose of olive oil and a handful of parmesan cheese. If it needs more water, pour it in a quarter cup at a time, and keep it pureeing until it is a nice, thick, pale-green sauce. Season it with salt and pepper and whirl it one more time.

That's it!

Serve it over pasta, and wait for comments like I got:

"Mom, I usually don't like tortellini at all, but this is really good!"

--and--

"Yum! Can I have seconds?"


That, my friends, is turning trash into a treasure.

Wednesday, October 19, 2011

salsa

What do salsa the condiment and salsa the dance have in common?

They're both made better by a margarita.

Although I wish I could say that I spent the day dancing the salsa with a handsome man named Javier, I can't. What I can say is that I spent a day canning salsa. As a matter of fact I canned enough salsa to last far longer than any relationship with Javier would.

When I say I spent a whole day, I really mean it. It was one of those days where I was in and out a lot, but in between, from 7 in the morning until 8 at night, I was chopping vegetables and boiling jars. This salsa recipe, that I got from the Ball Complete Book of Home Preserving, is not complicated. It doesn't need crazy ingredients or require unheard of steps. It just makes an enormous batch of salsa, and therefore requires an enormous amount of time chopping. As a matter of fact, when the kids asked what was for dinner, I looked around the kitchen and said, "hmmm...salsa?" There wasn't anything else to be had!

Actually, I felt a little bit like a pioneer while making this. Not like Pioneer Woman (she can do anything With élan and verve that I ain't got.). And not like those Mormon pioneers who came across the plains with their 18 children and covered wagons. Goodness knows I couldn't have done it without a drink at the end of one of those days of trekking across the wilderness. I felt rather like the kind of pioneer who "puts up" the veggies at the end of the harvest.  The person who had to preserve the food because when the summer ended, there would be no more tomatoes for another 9 months, and the would need it to last through the winter.

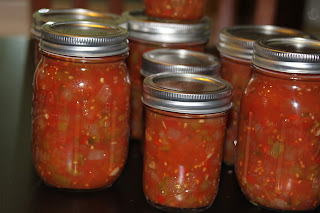
We only had four tomato plants, but they were prolific this year! Those tomatoes plus the tomatoes I got in the Abundant Harvest box turned out to be more than we could use all at once for a couple of weeks there. And so, the canning. Like I said, this recipe makes a heap of salsa. It used up all the tomatoes that were threatening to fall apart on the kitchen counter, plus some other spare parts slowly dying in the fridge. It does take a ton of chopping, but it makes a ton of salsa. And around here, a ton of salsa is a good thing (balancing out those margaritas and all). In the end, I had 6 pint jars plus 3 8-ounce jars of salsa. Yum.

I followed the Ball recipe exactly. I rarely follow a recipe 100%, but with canning I wasn't going to take any chances. If you want to preserve it, you have to be really careful with acid levels, so that bacteria doesn't grow when it's in the jars. Since botulism doesn't go as well with margaritas, I decided to just be safe. And so, here it is:


Zesty Salsa
Use whatever type of chili peppers your family prefers, and add hot pepper sauce if your tastes are even more daring.


10 cups of chopped, cored, peeled tomatoes
5 cups chopped, seeded green bell peppers
5 cups chopped onions
2 1/2 cups chopped seeded chili peppers, such as hot banana, Hungarian wax, serrano, or jalapeno
1 1/4 cups cider vinegar
3 cloves garlic, finely chopped
2 tablespoons finely chopped cilantro
1 tablespoon salt
1 teaspoon hot pepper sauce (optional)

1. Prepare canner, jars, and lids.

2. In a large stainless steel saucepan, combine tomatoes, green peppers, onions, chili peppers, vinegar, garlic, cilantro, salt, and hot pepper sauce, if using. Bring to a boil over medium-high heat, stirring constantly. Reduce heat and boil gently, stirring frequently, until slightly thickened, about 10 minutes.

3. Ladle hot salsa into hot jars, leaving 1/2 inch head space. Remove air bubbles and adjust headspace, if necessary, by adding hot salsa Wipe rim. Center lid on jar. Screw band down until resistance is met, then increase until finger-tip tight.

4. Place jars in canner, ensuring they are completely covered with water. Bring to a boil and process both 8-ounce and pint jars for 15 minutes. Remove canner lid. Wait five minutes, then remove jars, cool, and store.

Thursday, September 22, 2011

Apple Sauce. And Jesus.

In my Abundant Harvest box this week, I got this big beautiful bunch of green apples.

The kids were so excited to see apples that they bit right into them... and then puckered up their little faces. They're pretty tart, as it turns out.


I decided to make applesauce out of them... 

... but before I give you the recipe, I need to tell you that Jesus was in my kitchen.

You know how some people see Jesus in different objects? And then they are born again and become religious and saved? 

For example, Jesus has been seen in a tree:


 Or a KitKat bar:

One person even saw Jesus in the dregs of his beer. Well, probably lots of people have seen Jesus in the dregs of their beer, but one person still had enough sense left in him to photograph it:


And, of course, if you are a fan of Glee, you will remember the grilled Jesus:


Remember that bowl of apples I showed at the beginning? I emptied it and peeled the apples, and then inverted the empty bowl into my dishwasher. And. There. Was. Jesus.

I'm warning you, this is not for the faint of heart. Jesus is there (at least I think it's him). But he is NOT happy.

scroll down if you are stout hearted enough to view sad apple bowl Jesus. Also scroll down if you want to get past this nonsense and make apple sauce.


I warned you. Not happy.

At any rate, after doing penance and atoning and a couple of other things, I made the applesauce.

And here is how:

Peel your apples and chop them into little chunks.

Put them all in a pot and fill with just enough water to almost cover them. Add some sugar. Not too much (maybe a couple of tablespoons?). You can always add more later, so you can decide just how sweet you need it to be. You can also add a little cinnamon if that's your thing.


Let is all simmer for a long long long time. This pot simmered for about an hour. Stir it every so often. When you can see that the apples are all turning to mush, you are done! You can stop while it is a little chunky if you'd like, or you can keep going until it is pretty smooth. Add some more sugar if you want, and voila! Apple Sauce!


We go through apple sauce pretty quickly around here, so I didn't bother sealing and preserving the jars. They won't stay in the fridge long enough to warrant it. But if you wanted to, you could follow these instructions.

Tuesday, August 23, 2011

Fresh Ranch Dressing

Sing this (out loud or in your head, you choose) to the tune of Love and Marriage:

Ranch and Veggies, Ranch and Veggies, The shock of healthy is so much less edgy...


Okay, a poet I am not. I guess I'll keep my day job.

We go through so many salads and miscellaneous other veggie dipping experiences that Ranch Dressing is a hot commodity around here. 

I love the stuff. But I have to say, I don't love it out of a bottle. I found that Marie's brand dressing (found, refrigerated, in the produce department) is pretty dang close to fresh ranch. Except it's pretty pricey. And still not perfect.


The good news, though, is that ranch dressing is super easy to throw together, and it's pretty much all ingredients you probably have already. I wish I could remember where I got this recipe, so I could give props to the creator. 


Here is the recipe I use:

1/2 - 1 tsp. sugar
1-2 cloves garlic
1/4-1/2 onion powder
salt to taste
1/4 cup Italian flat-leaf parsley
2 tablespoons chives
1 cup mayonnaise
1/2 cup sour cream
2 tsp. apple cider vinegar
1/2 - 1 tsp fresh dill
1/8 black pepper
1/2 tsp. dried oregano
buttermilk (as needed for desired consistency)

Mince the garlic with a knife, and then sprinkle about 1/8 to 1/4 teaspoon salt on it and mash it into a paste with a fork.

Chop the parsley, and chives very finely and add to the garlic.

In a bowl, combine all ingredients, tasting frequently and adjusting seasonings as needed.


Chill for a couple of hours before serving, and thin with buttermilk if desired. I usually leave it thick if it is going to be for dipping, and I thin it before I pour it over a salad.

Friday, August 19, 2011

Fresh Tomato and Basil Pasta Sauce

We have tried growing a small garden for the past couple of summers. Last year was mildly successful. We got quite a few tomatoes, a few chile peppers, and fed some very young basil, cucumber, and zucchini plants to the bugs.

This year we have had a bit more successful. The tomatoes have been gorgeous; the basil managed to grow to a size that can handle the bug infestation better. Since Abundant Harvest is keeping us up to our ears in zucchini and cucumbers, we felt no need to try to grow those. We did add tomatillos this year. So far, the plants are filled with tiny little fruits that seem to be growing steadily, although slowly. The plants are gorgeous, though. They are leggy and bright green and have adorable little yellow flowers all over them.  I don't mind that they are using up valuable garden real estate that could have seen a couple of rounds of something else. Besides, how could I possibly use up a couple of rounds of something else? 

This week we seemed to have about a million tomatoes come ripe all at the same time. I went ahead and brought them all in, combined them with the tomatoes that I got in the AHO box, and made a batch of pasta sauce for the freezer. There is something amazing about picking the tomatoes, and then while they are still warm from the sun, washing and chopping them up. It's lethargic to work with something that fresh.

I think I may never have to go grocery shopping again. For the rest of my life.

Pasta sauce isn't difficult. It's just a matter of pureeing the tomatoes, adding some spices, and letting it all simmer and meld for a long time. Plus, it sure smells good while it simmers for a couple of hours!


Fresh Tomato and Basil Pasta Sauce
I cannot vouch for the acid level of this sauce, so if you want to can it you need to do it in a pressure canner. Unless, of course, you know a lot more about food safety than I do. As for me, I just put it in the freezer.


I based this recipe on the one in Animal Vegetable Miracle, and it can easily be multiplied to make a big batch of sauce. It is so easy, but long, that you might want to make a whole bunch while the tomatoes are ripe, to use all year.

2 quarts tomato puree (about 6 pounds tomatoes, hulled and pureed in a blender or food processor)
1 large onion, diced
1/4 cup fresh basil, chopped
1 Tablespoon honey
1 Tablespoon dried oregano
1 teaspoon salt
1 teaspoon thyme
1 teaspoon garlic powder
1/2 teaspoon pepper

Saute onions in a large pot, until soft and translucent. Add pureed tomatoes and all of the seasonings. Bring it all to a boil and then reduce to a simmer. Simmer on low heat for about 2 hours, until the sauce is a thickness that you like. Stir occasionally (more frequently toward the end).

Pour into jars or freezer bags and freeze (or refrigerate if you plan to use it soon).


Monday, August 15, 2011

basil pesto

As I mentioned last week, this here little blog is now adhering to the concept of Meatless Mondays.

I have decided to start buying free-range, organic, grass-fed beef and chicken, and it's not as cheap as buying the equivalent meat in a supermarket or at Costco. However, here's the thing. The meat at Costco and the supermarket isn't the equivalent. Once I started reading about feed lots and factory farms and the stuff that the animals consume (as in cheep feed, antibiotics, and hormones) I decided I just can't give that stuff to my kids.

I am not so much worried about the chances of them dying of e coli or mad cow disease. I realize that the chances are very slim, and there are slim chances that they could die form anything at any moment. Lightning might strike one, or a plane could crash. If I lived my life worried about the things that could happen, I would have them all stuck in the house, wrapped in bubble wrap and eating only organic water chestnuts.

I am more concerned about the things that will happen over time. And my kids have a lot of time left for things to build up in their systems. (Let alone all the things building up in our ecosystems). Studies are showing that kids are hitting puberty earlier and earlier (thanks, in part, to hormones in the milk and meat), which leads to problems physically and socially. Doctors are finding kids who are obese, and yet malnourished (thanks, in part, to food that is primarily made of soy and corn... and yes, even cows are primarily made of soy and corn). A huge percentage of the food we eat is processed and sold by a very few companies, with very few ingredients. We are also in a race to keep developing new antibiotics faster than the diseases are developing resistance to them. The diet the food animals are being fed is so different than the diet they would have had naturally that the animals constantly get sick. Rather than change the diet, though, the factory farms just treat the sickness, by adding antibiotics right into the very food that weakens the animals in the first place. I don't want my kids' bodies to have a baseline of antibiotics already in their systems from the meat they eat. I want them to be able to fight disease.

There are so many ways to fight the problems in our food supply. One is to eat more fruits and veggies than we are currently eating. Another is to avoid the empty calories and processed foods that we are inundated with. We need to eat a bigger variety of foods, and we need to be careful about where we get the food, in order to avoid eating pesticides, antibiotics, meat from diseased animals, and chemicals.

One of the things I am focusing on is eating better meat. However, I do realize that it costs more. I am glad it does, because I find something wrong with 50 chicken nuggets for $9.99. That can't be quality food. I am willing to pay the money that the farmer requires to keep his livestock healthy and happy. I don't think $1.99 a pound is a bargain when I think about what I got for my $1.99.

I haven't found a tree (organic or otherwise) that grows money, however.  I can't afford to buy great meat as much as I was able to buy bad meat. And so, we will eat less meat.

I had a neighbor years ago who had moved here from Afghanistan. As she was preparing food for an Eid celebration, she mentioned to me that she would be cooking different dishes than she usually feeds her family. She said, "This is a party to celebrate the end of a month of fasting. I will have to honor my guests by serving them meat. Ordinarily we don't eat much meat."

I think I need to readjust my way of thinking to be more like that. Meat is a luxury. I don't plan to become a vegetarian, but I don't need to eat meat at every meal. It can become a special food. I don't plan to fast every day for a month either, but I am sure that the more I go without meat, the more I will appreciate it when I eat it.

I am also not going to make a huge stink about it. I won't turn away dinner at a friend's house if she buys her chicken breasts at Costco. I won't avoid restaurants (although I may opt for meatless entrees). As it is, though, I have this huge box of vegetables to eat my way though every week, so I am not going to restaurants much these days anyway!

And so, Meatless Mondays. I will certainly have more meatless days than just Monday. I just want to make sure that at least once a week we eat no meat. I figure if I make a point to do it on Monday, and I happen to eat meatlessly any other days, all the better.

There we have it. The long-winded version of why I made pesto. But wait! There are other reasons to make pesto. Don't do it because you are denying yourself meat. Do it because it is delicious, versatile, and easy. Do it because it freezes well, so you can have quick delicious meals any weeknight you want. Do it because basil is the food of the gods, and there could never be enough ways to enjoy it.


Basil Pesto
2 cups packed fresh basil leaves
2 garlic cloves
1/4 cup cashews or pine nuts (I happened to have cashews on hand, and although they have different tastes, both work well)
2/3 cup olive oil
salt and pepper to taste
1/2 cup parmesan cheese

Place the basil, garlic, and nuts in a food processor and pulse until it is chopped.
Add the oil. (If you plan to freeze it to use later, only add 1/2 cup of the oil at this point. If you are going to use it right away, add it all). Add salt and pepper and cheese and pulse until it is smooth.

If you are going to freeze it, put it in a airtight container, and pour the rest of the oil on top (this will help it keep the beautiful bright green color, and keep it fresher).

The pesto works great with pasta, on pizza, or spread on crostini. You can also use it to flavor chicken or fish. On Tuesday.

I used my pesto to make a pizza. I used this pizza crust recipe. After rolling out the dough, spread a thin layer of the pesto over it. Top it with fresh mozzarella slices and slices of ripe tomatoes.

You can grill it (like I did) or cook it in the oven. Either way, it's a little slice of heaven.


Friday, August 12, 2011

Peach Margarita

I think I mentioned a couple of days ago that I might need a couple of drinks to get me through the end of summer and my baby starting kindergarten. Well, despite today's post on margaritas, I would like to assert here and now that I am not drinking my miseries away. It just so happens that I had a couple of chances to make and enjoy some great fruity drinks.


When Life gives you lemons, make lemonade.

When life gives you peaches, make peach pie margaritas.

Let's assume for a minute here that you don't need all that butter and processed flour and sugar that is in a pie crust. We'll just skip over the crust, stir in some tequila, and consider it dieting.

We thought we would take advantage of the fact that the summer fruit trees are exploding and the prices are low on ripe fruit, and we bought an extra 20 pounds of peaches from Abundant Harvest. After canning most of them (to enjoy during the long winter months of citrus), and freezing some (for my morning smoothie), I still had a few left over. 

Peach margaritas are delicious. They beat the pants off of any sort of neon green stuff you mix with tequila. I am not one to ever turn down a real margarita mixed with Cointreau or Grand Marnier, but this adds a little summery twist that makes the margarita an amazing treat. This drink is basically just a standard margarita with some peach syrup mixed in. I got the recipe from How Sweet It Is, and I am heading back over there to try lots more of her stuff. Although she swears off vegetables, I think she has plenty to offer me. Like margaritas.


To make the peach syrup:

Make some simple syrup (boil equal parts water and sugar until the sugar is dissolved). Combine one cup of simple syrup with three peaches (that you peeled and chopped) in your blender. Puree until it is smooth.

You can use this syrup in the many of the same ways as the plum syrup of earlier this week.  (pour it one cupcakes, shake it with vodka, make a spritzer with club soda, and on and on).

But first, promise me you'll do this: Make the margarita. You won't regret it, and you'll have some peach syrup left over for less lofty goals.


To make the margarita:

Salt the rim of a glass and fill it with crushed ice. In a cocktail shaker, combine the peach syrup with 2 ounces Triple Sec or Grand Marnier, 1 1/2 ounces of tequila, 2 ounces lime juice (either fresh squeezed, or Rose's Sweetened Lime Juice in a pinch). The amount of peach syrup is up to you. I used about 1 1/2 ounce, since I didn't want the drink to be too sweet and sugary. I like a little bite to it. Also, if you use Rose's lime juice, it will make the drink a little sweeter than fresh lime juice, so you may want to scale back the peach syrup. Hey, it just means you can make more drinks in the long run!

Shake it all up and pour it over your ice.

Sit back, put your feet up, and say "aaaah."

Wednesday, August 10, 2011

Plum-Vanilla Syrup

My kids return to school a week from today. My baby is starting kindergarten, and I keep having dreams that the teacher has to come up to me and tell me it is time to leave, that I can't stay at school with him all day. It isn't pleasant. He is a ton of fun to have around, and I am gonna miss him. 

On the one hand, I don't want summer to end. Ever. I love taking the kids to the beach, museums, parks, gardens, and swimming pools. I love sleeping in. I love staying in pajamas well past noon.

On the other hand, if these kids lose one more pair of flip flops, or make one more mess that they don't want to clean up, or squabble one more time, I might lose my mind. It will be kinda nice to have them all gone, making their messes somewhere else for a few hours a day.

It might take a couple of cocktails to get me through the end of summer. Then again, it might take me a couple of cocktails to get me through the first day of school.

Either way, I better be prepared.

Lucky for me, I found this recipe for Plum Vanilla Syrup. It is a great way to hang on to these last days of summer. This delicious syrup is really quite simple... just vanilla simple syrup and plums. 

The possibilities for it are endless, though.

I used it to make a cocktail, by mixing it with vodka and club soda. You could make a bellini by adding it to Prosecco. Or a kid-friendly, homemade, dye- and corn syrup-free soda by just mixing it with club soda or sparkling water. I can imagine it poured over ice cream, or even pancakes, or drizzled over some toasted pound cake.

Plum-Vanilla Syrup
I got the recipe from The Farmer's Daughter, who happens to be one of the growers who contribute to my Abundant Harvest Organics box, and also blogs about what she does with the stuff she grows.

1/2 cup water
1/2 cup sugar
1 vanilla bean
8 ripe plums, chopped

First, slice the vanilla bean lengthwise and scrape the seeds.


In a medium saucepan, combine the sugar, water, and vanilla bean. Bring to a boil, lower the heat, and simmer for about 5 minutes. Add the chopped plums and simmer for another 5 minutes. 

Let it cool. Remove the vanilla bean, and pour the rest into a blender. Puree until smooth.

Now, have fun with it. I sure did!


Monday, July 18, 2011

plum syrup and plum grilling sauce

And so, after making plum sauce and plum jam and plum galette and plum cake, my plum supply was dwindling. Finally.


Dwindling but not gone, that is. Luckily, I found another recipe to use up the rest of the plums. This one, happily, makes two different products at the same time! And it's easy! I promise!


Using a big pile of plums, you cook them for a bit, and strain out the syrup to store for use on pancakes and whatnot. Then you take the leftover plum solids, add a few more ingredients and puree it into a sauce for grilling ribs, chicken, pork, or whatever else you like to put on your grill.


Plum Syrup and Plum Grilling sauce
(from neighborhoodfruit.com)


3 pounds very ripe plums
1-2 cups sugar
1 jalapeno pepper
1-2 teaspoons salt
1 red onion
1 Tablespoon olive oil


First, we make the syrup. Take all the plums and mush out, smoosh out the pits. Don't worry about how much you destroy them in the process, it's all getting pureed later. Just get the pits out the best you can, and save all the juice, pulp, and skins.


Add some of the sugar to the plums in a large pot, and simmer it all for about 15-20 minutes. If it is dry, you can add water. If your plums were super ripe, they should be juicy enough, though. While it simmers, you can add more sugar if you like. I used about 1 cup total, and it tasted great. (My plums were extremely sweet and ripe when I started.)


After 20 minutes or so, turn off the heat and let it cool a bit. Place a colander into a large bowl, and strain out the syrup. 


Now, we make the grilling sauce.


Meanwhile, chop the onion and caramelize it in a pan with the olive oil. 


Add the cooked onions, the plum solids, the pepper, and the salt to a blender. Puree it all until it is smooth. Voila! You're done! It's a great sauce to grill with!


You can keep both the sauce and the syrup in the fridge to use up int he next few weeks. If, like me, though, you have too much food in your fridge and you want to save it for future use, let's can it.


Pour both into your jars, and be sure to label which is which!


If you need to read about how to can, I suggest this document.

If you already know about canning, here is a chart for how long to process it:


( I couldn't find the processing time for plum syrup, but every other syrup I found was 10 minutes for pints or quarts at 0-1,000 feet, 15 minutes at 1,001-6,000 feet, so that is what I went with.)


Table 1. Recommended process time for Fruit Purees in a boiling-water canner.
 Process Time at Altitudes of
Style of PackJar Size0 - 1,000 ft1,001 - 6,000 ftAbove 6,000 ft
HotPints or Quarts15 min2025


Monday, July 11, 2011

Asian Plum Sauce

Okay, so I mentioned that we were given a gift of plums. Lots of plums.


I am thrilled, of course. It is lovely to receive such a wonderful gift. It is nice that there this person who has a very fruitful tree, who knows that she can't use all of the fruit, and who wants to share it with friends. It is also wonderful that there is this other person who has become obsessed with saving every living piece of vegetable matter in the world and using it for the greater good. And therefore she can't say no to saving the plums from rotting into the soil under the tree.

It's just that I think I have a problem. I keep reading things that tell me how important it is to eat and feed my family organic produce. And how imperative it is to eat things that are in season and locally grown. How doing this will save the environment, protect against cancer, insure that the labor force on the farms is protected, and allow me to enjoy amazing quality fruits and vegetables in their prime, the way they are meant to be enjoyed. I also read about how the USA is exporting potatoes... and importing even more.  And how there are people starving all over the world, because we are growing (and purchasing) huge industrial crops, which have to be altered to be edible, instead of growing food that we can eat and letting everyone else grow food that they can eat.

Okay, so all that adds up to the fact that when there is a piece of fruit, grown in my own neighborhood without pesticides, and there is no fuel consumption or labor force or huge conglomerate corporation to feel guilty about, I feel like I have found the holy grail. It feels sinful to waste the very thing that I am searching for.

Never mind that fact that there are about 700 holy grails in my kitchen right now. I can save each and every one of them. I can!!

So, this week it is the plum. We canned and baked and froze and ate 23 pounds of cherries. Then we canned and cooked and ate close to the same amount of apricots. And now, we have plums.

Remember when I talked about stone fruits? And how there are clingstones and freestones? And how the apricots are so fun and easy to work with because they are freestones and the pit practically jumps out of the fruit?

Well, meet the plum. The clingstone plum.

Here is the irony: If a plum is ripe, it is so amazingly soft and sweet that you want to freeze forever the flavor, scent, and texture. But, the fruit clings so forcefully to the pit that you also want to curse and cry and hire someone to get the fruit out for you. On the other hand, if you can get to the fruit before it gets quite so ripe, the pit is a little easier to get out.  Of course, the fruit is tart and makes your face squinch up when you eat it. What is a plum eater to do? Use the different stages of ripeness for different purposes, and just accept that the path isn't going to be easy, but the destination is all worth it. Like many things in life, it is worth working for.

Here is an almost-ripe plum cut in half. See how the stone is pretty much free of the fruit? But the fruit is pretty firm still, and not very juicy (or sweet).


Here, on the other hand, is a very ripe plum. The fruit clung to the pit, and almost none came off with the peel. But it sure is nice and soft... and sweet and juicy!


This very ripe plum will require some effort to get the pit out. My recommendation is to use these very ripe fruits for sauces and jams, because the fruit all gets mushed up together anyway, and it doesn't matter how much you mangle it in your efforts to get the pit out. Save the lesser-ripe fruits for recipes where you are going to want pieces of plums to look like pieces of plums.

The first thing I did with the plums was to make plum sauce... the sauce that is used in many Asian recipes as a base for stir-frys. I LOVE plum sauce, and it makes meals very easy to put together on busy weeknights. Having a few jars of this in the house is going to make life much simpler in the months to come. Tomorrow I will give you one suggestion of how to use plum sauce in a very simple, quick stir-fry dinner.

For now, though, we must start by making the sauce. I actually tried two different recipes, and one seemed so very far superior in the final flavor that I am not going to bother giving you the other recipe.

I selected the darkest and softest plums for this sauce. I wanted to get to them before they rotted, and it worked well to have them mushy in cooking this sauce.

I started to cut them in half and twist apart the sides, but they were so soft and ripe that I ended up just squeezing the pit out with my fingers, and trying to pull as much fruit off of it as possible. You want a balance of the sweet fruit and the tart skin for this recipe, but in cases where the plum was so ripe that the fruit easily slid off of the skin, I went ahead and threw out the skin. I probably used about half of the skins in the long run. Other than getting the plums pitted, and measuring out ingredients, this recipe is very easy (although time-consuming).


Asian Plum Sauce

6 cups chopped, pitted red plums
1 1/2 cups brown sugar
1 cup sugar
1 cup vinegar
1 small onion, minced
1 teaspoon crushed cried red chili pepper flakes
4 garlic cloves, minced
1 tablespoon fresh ginger, minced
2 tablespoons soy sauce
1 tablespoon fresh basil, minced
1 tablespoon fresh tarragon, minced

Combine all ingredients in a large stockpot, and cook over medium heat for about 1 1 /2 hours, until thick and syrupy.

Fill jars, leaving 1/4 inch headspace. Wipe rims of the jars, place lids and rings (fingertip tight) and process in boiling water for 15 minutes (adding time for elevation). Turn off heat and let jars sit for 5 minutes before removing from water bath. Remove from water and let sit, undisturbed, for 12 hours before touching.


Come back tomorrow for a suggestion for using the plum sauce!