New Here? Read The Story behind the Box

Showing posts with label cilantro. Show all posts

Sunday, June 24, 2012

Tandoori Turkey Burgers

Last week, we did Cub Scout camp. For five days, I spent the hours between 8:30 and 5:30 at a campsite, helping boys do crafts, shoot arrows, use slingshots, cook in a cardboard box oven, play football and badminton, and generally just be dirty, busy, loud, active, competitive boys. My two sons participated in camp, and my daughter worked her tail off as a junior volunteer.

Each night, we came trudging into the house, peeling filthy socks off our feet, dropping the camp t-shirts into a pile, and flopping onto the couch. 

Dinner needed to be something simple, and something quick for these kids who had run, climbed, swam, and hiked all day long in the hot sun. They were hungry and tired... not a great combination.  


These turkey burgers did the trick! They are pretty simple to throw together, they can be grilled in just a couple of minutes (while the kids hose the first layer of grime off each other), and they are TASTY. Topped with cilantro, onion, and cucumber, and a delicious yogurt sauce, they are nice and light and flavorful, just perfect for a hot night.

The recipe came from Bake Bree, and I only made a few tweaks. 

Tandoori Turkey Burgers

1 pounds ground turkey
4 green onions
3 Tablespoons grated fresh ginger
2 Tablespoons lemon juice
1 Tablespoon paprika
2 teaspoons cumin
1/2 teaspoons ground cardamom
salt and pepper to taste
Pita bread
persian cucumber
cilantro
red onion sliced thinly

yogurt sauce:
1 small container plain Greek yogurt
1 Tablespoon fresh mint, chopped
2 teaspoons cumin
1 Tablespoon fresh lemon juice
salt and pepper

Using your hands, combine the turkey, green onions, ginger, lemon juice, and spices. Form into 4-5 patties. Grill over medium-high heat until cooked through. Grill the pita bread for the last couple of minutes.

Meanwhile, stir together all of the ingredients for the yogurt sauce.

Place a burger patty onto each piece of pita bread. Top with the cucumber, cilantro, and onion. 


Drizzle on some sauce, and enjoy!


Thursday, March 29, 2012

Larb (Thai Salad)

Oh happy day! I love when I discover that one of my favorite, special occasion, once-in-a-while treats can be made easily and with great results at home!


Larb has always been one of my favorite things to order at a Thai restaurant, when I am being schmancy and ordering appetizers. It seems like an appetizer to me, that is, but it is usually found under the salad portion of the menu. (maybe because the veggies in it are added at the end and not cooked?) If you have never had it, either make this version or go to a Thai restaurant (tonight!) and order it. You won't regret it. Despite the unfortunate-sounding name (to our western ears) the dish is to. die. for.


Before I move on, I feel I need to give props to Laos. I discovered, in looking up some different versions of Larb recipes, that it is actually the national dish of Laos. Who knew? I haven't been to a Laotian restaurant (or Laos for that matter), but I know what I will be ordering if I ever do go! (To either a restaurant or the country, that is). I also learned that a portion of Thailand used to be Laos (Again, who knew? I am clearly not up to snuff on my Asian history), and that this dish is common mostly in that part of Thailand. Well. I am glad for that, because that means it made it into some of my favorite restaurants. And if you live in town, go to Thai Pepper on Main Street and order the Larb. It's number 19 under the ... you guessed it... salad portion of the menu. Not only is the food fabulous, but so is the adorable older couple who own the place.

Ahem. Back to the appetizer salad recipe at hand. Larb is a mixture of meat (I have seen it made with chicken, beef, turkey, and pork), lime juice, fish sauce, and cilantro and onions. All flavored with garlic and ginger.


I found this recipe thanks to Rachel at De Ma Cuisine, who does the weekly cooking show and meal planner for Abundant Harvest. If you are an AHO subscriber (or just a lover of fresh delicious veggie-loaded food), check her out! She is adorable, her show is fun, and her recipes are yummy. Anyway, Rachel had included this on her weekly plan when we got cabbages in her box. The recipe was listed as Thai Beef Cabbage Cups, which intrigued me. When I saw the subtitle (Larb), I was hooked.

I followed the recipe more or less, but I added a little fresh basil, and forgot the peanuts (accidentally). It's perfect! I think I will try making it with turkey next time, since the beef tastes still rather beefy, and I think the turkey might take on more of the flavors of the garlic and ginger, but I am not complaining. I am in love!


Larb

2 1/2 teaspoons dark sesame oil, divided
3 teaspoons minced fresh ginger
3 garlic cloves, minced
1 pound ground sirloin (or turkey, or chicken, or....)
1 tablespoon sugar
2 tablespoons fresh lime juice
1 1/2 tablespoons fish sauce
1/4 teaspoon crushed red pepper
1/2 cup vertically sliced onion
1/2 cup chopped fresh cilantro
1/2 cup chopped fresh basil
8 large cabbage leaves
2 teaspoons finely chopped peanuts

Heat a skillet over medium-high heat. Add 2 teaspoons of the sesame oil to the pan. Add the ginger and garlic and cook for one minute stirring constantly. Add the meat and cook, stirring to break it up, until it is done all the way through.

Combine the rest of the sesame oil, sugar, lime juice, fish sauce, and crushed pepper in a large bowl When the meat is cooked, add it to the bowl along with the cilantro, basil, and onion, and toss well.

Divide the meat mixture into the cabbage leaves, and serve. (At this point, you may want to go ahead and add the peanuts. I wish I had!)


Thursday, February 16, 2012

Thai Chicken Pizza

Once upon a time, when I was a starving college student, and my cousin was a starving graduate student, we found ourselves making dinner together one night. This memory almost feels like a dream, because my cousin lived on the opposite coast of the United States from me, and I am pretty sure that only once in our lives did we make dinner together.

Anyway, she had a new cookbook she was trying out, and we leafed through it together, to choose a recipe to cook for dinner that night. We chose the Pacific Rim Chicken Pizza, which was a sort of Thai-inspired chicken and veggie pizza with peanut sauce. Being as we were starving college students, we couldn't afford to buy all of the 13 ingredients it required, so we made some cuts and some substitutions and came up with a poor man's version of the dish. But as I recall, it came out great and we were quite proud of our culinary achievement.


I decided right then and there that I needed the cookbook. I am not sure why, as a student who couldn't afford to buy any of the ingredients to follow the recipes, I felt that I had to have this cookbook. But I did. My mother got it for me as a Christmas gift that year, and I have to admit that I haven't used it too much since then. When I do use it, though, I really like it.

Anyway, when I saw that the Improv Cooking Challenge this month was to use carrots and ginger together in a recipe, I immediately remembered this pizza, that I haven't made since that night 17 years ago  long ago  when I was in college.


This time, rather than substituting things that are cheaper, I made different substitutions. I made my own pizza crust instead of buying one (I find it easier to turn on my mixer than to run to the market). I also used orange marmalade since I like the tang of it better than mango chutney. Finally, I substituted a half of a leek for the green onions, since I got one in my Abundant Harvest CSA box this week.

Here is the Thai Chicken Pizza that I largely based on the Pacific Rim Pizza recipe from Eating Well is the Best Revenge.


Thai Chicken Pizza


1 pizza crust (I used my recipe, which you can find here)
3 carrots, cut into matchsticks (about 1 cup)
1 green bell pepper, cut into matchsticks (about 1 cup)
1/2 leek, diced
1 boneless, skinless chicken breast (if you have leftover cooked chicken, that's great. If not, you can bake a breast while you work on the pizza)
1 tablespoon coarsely grated ginger
2 tablespoons orange marmalade (I make that too, which you can see here... or just buy it)
3 tablespoons unsalted peanut butter
2 tablespoons Asian cooking wine (or use some dry white wine or cooking sherry)
2 tablespoons rice vinegar
2 tablespoons chopped fresh cilantro


Start by making your pizza crust. Or if you are using pre-made pizza dough, roll it out. Trader Joe's has a great pizza dough in the dairy case. Heat the oven to about 450 degrees, and bake the pizza crust until it is about half-way done. (about 6-7 minutes). This will keep it from getting soggy when we load it up with the other yummy stuff.

If you are cooking your chicken, pop it in the oven once the crust is done, and take it out as soon as it is cooked through (about 10-15 minutes).

Meanwhile, start chopping the carrots, bell pepper, and leeks.  Set them aside, and in a small bowl, whisk together the ginger, marmalade, peanut butter, cooking wine, and vinegar.

Once the chicken is done, cut it into matchsticks also. Keeping all the toppings the same size and shape makes sure that each bite of pizza has a great balance of all the yummy flavors!

Toss together the chopped vegetables, the chicken, and the peanut/ginger sauce.

Spread it out evenly on the pizza crust, making sure to get it close to the edges all around.

Bake it for another 6-7 minutes, until the edges of the pizza begin to brown.

Sprinkle the chopped cilantro on top, slice, and serve.


This recipe is linked to the Improv Cooking Challenge.


Improv Challenge


Wednesday, October 19, 2011

salsa

What do salsa the condiment and salsa the dance have in common?

They're both made better by a margarita.

Although I wish I could say that I spent the day dancing the salsa with a handsome man named Javier, I can't. What I can say is that I spent a day canning salsa. As a matter of fact I canned enough salsa to last far longer than any relationship with Javier would.

When I say I spent a whole day, I really mean it. It was one of those days where I was in and out a lot, but in between, from 7 in the morning until 8 at night, I was chopping vegetables and boiling jars. This salsa recipe, that I got from the Ball Complete Book of Home Preserving, is not complicated. It doesn't need crazy ingredients or require unheard of steps. It just makes an enormous batch of salsa, and therefore requires an enormous amount of time chopping. As a matter of fact, when the kids asked what was for dinner, I looked around the kitchen and said, "hmmm...salsa?" There wasn't anything else to be had!

Actually, I felt a little bit like a pioneer while making this. Not like Pioneer Woman (she can do anything With élan and verve that I ain't got.). And not like those Mormon pioneers who came across the plains with their 18 children and covered wagons. Goodness knows I couldn't have done it without a drink at the end of one of those days of trekking across the wilderness. I felt rather like the kind of pioneer who "puts up" the veggies at the end of the harvest.  The person who had to preserve the food because when the summer ended, there would be no more tomatoes for another 9 months, and the would need it to last through the winter.

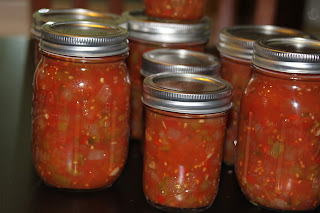
We only had four tomato plants, but they were prolific this year! Those tomatoes plus the tomatoes I got in the Abundant Harvest box turned out to be more than we could use all at once for a couple of weeks there. And so, the canning. Like I said, this recipe makes a heap of salsa. It used up all the tomatoes that were threatening to fall apart on the kitchen counter, plus some other spare parts slowly dying in the fridge. It does take a ton of chopping, but it makes a ton of salsa. And around here, a ton of salsa is a good thing (balancing out those margaritas and all). In the end, I had 6 pint jars plus 3 8-ounce jars of salsa. Yum.

I followed the Ball recipe exactly. I rarely follow a recipe 100%, but with canning I wasn't going to take any chances. If you want to preserve it, you have to be really careful with acid levels, so that bacteria doesn't grow when it's in the jars. Since botulism doesn't go as well with margaritas, I decided to just be safe. And so, here it is:


Zesty Salsa
Use whatever type of chili peppers your family prefers, and add hot pepper sauce if your tastes are even more daring.


10 cups of chopped, cored, peeled tomatoes
5 cups chopped, seeded green bell peppers
5 cups chopped onions
2 1/2 cups chopped seeded chili peppers, such as hot banana, Hungarian wax, serrano, or jalapeno
1 1/4 cups cider vinegar
3 cloves garlic, finely chopped
2 tablespoons finely chopped cilantro
1 tablespoon salt
1 teaspoon hot pepper sauce (optional)

1. Prepare canner, jars, and lids.

2. In a large stainless steel saucepan, combine tomatoes, green peppers, onions, chili peppers, vinegar, garlic, cilantro, salt, and hot pepper sauce, if using. Bring to a boil over medium-high heat, stirring constantly. Reduce heat and boil gently, stirring frequently, until slightly thickened, about 10 minutes.

3. Ladle hot salsa into hot jars, leaving 1/2 inch head space. Remove air bubbles and adjust headspace, if necessary, by adding hot salsa Wipe rim. Center lid on jar. Screw band down until resistance is met, then increase until finger-tip tight.

4. Place jars in canner, ensuring they are completely covered with water. Bring to a boil and process both 8-ounce and pint jars for 15 minutes. Remove canner lid. Wait five minutes, then remove jars, cool, and store.

Thursday, August 4, 2011

Spring Rolls

After driving halfway up California's Great Central Valley, and visiting Peterson Family Farm, we arrived at our campground.

AAAAHHHHH.

I love camping. I was trying to figure out why it seems so relaxing, when in reality many things are more difficult while camping. For example, washing dishes:

At home, I load the dishwasher (theoretically I do this as I create dirty dishes), pop in the detergent, and press "start."

While camping, I walk to the water spout to fill a dishpan. Then I walk back to fill a large pot. I place the pot onto the stove to heat the water. Once it boils, I divide the cold water and the hot water so that I end up with two pans of very warm water. One gets soap, the other is for rinsing. Then, I scrub each item in the first pan, transfer it to the rinse pan, and then place it into a drying rack. When they are all done, I have to throw the water out, place the dish rack into one pan, and invert the other pan over it all, in order to keep it dust-free.

Really, being at home is much easier, right?

Well, except.

At a campground, I have no floors to sweep, mop, or vaccuum. I have no beds to make (unless you count throwing the sleeping bag back to it's proper side of the tent). I have no washing machine or dryer to run. I have no windows to wash, furniture to dust, or showers to scrub. I also have no appointments to keep, errands to run, or practices and classes to shuttle kids to and from.

It's lovely.

As I mentioned, eons ago, we grabbed our Abundant Harvest box on the way to the campground. Meaning that there were all sorts of yummy fruits and veggies to consume during the week. Fortunately, we also had friends and family there to share in the harvest.


One fun use for many veggies was spring rolls. This was actually my mom's idea, and she got my kids and their friends involved right alongside the adults, in making this delicious appetizer.


They are super nutritious (all sorts of raw vegetables) and easy to make (very little actual cooking). Once the chopping was done, the kids pretty much took over, and the adults got busy eating the spring rolls as quickly as the kids could build them.


Spring Rolls

First, you need to buy spring roll wrappers. I have only seen them at Asian Markets.


It is an extra errand to run, but as you can see, they are certainly reasonably priced! This package didn't say how many it contains, and they were being eaten faster than I can count. However, I'd be willing to bet that for $1.49, we made at least 80 spring rolls.


Spring roll wrappers are made out of rice flour, water and salt. They are rolled out to be extremely thin, and then dried on bamboo mats.


They are almost transparent and completely dry (almost fragile) when you take them out of the package. After dipping them into warm water for a half-minute or so, they become pliable.


The other specialty ingredient is rice noodles. These can probably be found in any supermarket, but you will find them for a ridiculously low price if you get them at the Asian Market while you are picking up your spring roll wrappers. Cook the noodles according to the directions on the package. (Pretty much like cooking any pasta, but way faster). This is the only cooking you have to do.

Now, chop up your veggies. They should be chopped into match sticks. I used (of course) the stuff I had on hand, but any combo is bound to be good. I had carrots, basil, bell peppers (red and yellow), summer squash, lettuce, and cilantro. You could add almost anything. Some things that come to mind are bean sprouts, cucumber, celery, mushrooms, or radishes.


Once you have assembled your supplies (wrappers, cooked noodles, chopped veggies), you can begin rolling.

Take a wrapper, and submerge it in warm water until it is soft enough to fold without cracking (20-30 seconds). Lay it out and begin piling ingredients onto one side of it. Remember that it is small and needs to roll up, so go easy on the filling! A couple of pieces of each veggie, and bit of noodles is all it takes.

This one is filled very generously!
Once you have gotten all the good stuff on there, roll it and tuck the ends in as you go. (Like a burrito).


Since we had a whole group of rollers (ranging in age from 7 to... shall we say... adults?), we ended up with a whole range of rolling styles. Some were perfectly done.


Others looked a little more... creative.


But all of them were delicious!

Ordinarily, I would love to artfully display a platter-ful.
This time, though, I had to snap quickly. These hungry
campers weren't waiting to eat them! I don't think we ever had
more than four on the plate at any one time.


Once they are rolled, dip them in the most delicious dipping sauce ever. 

1 cup hoisin sauce
1 Tablespoon peanut butter
1 teaspoon rice vinegar
1/4 cup chopped peanuts

Mix together hoisin sauce, peanut butter and vinegar. If it seems too thick, you can stir in a little water. Top with chopped peanuts.


Thursday, May 5, 2011

It's eight o'clock somewhere

When I was a little tyke I hated going to bed at night, much like every little kid does. I was pretty much convinced that the minute my light was off, my parents were going to scoop some ice cream and enjoy it in front of the TV. As a matter of fact, I believe that the minute my light was off, my parents did enjoy a bowl of ice cream and some TV shows I wasn't supposed to watch.

The other day, as I was tucking my own kiddos into bed, my five-year-old said, "After I go to bed and you go downstairs to do your sweeping, will you try to find my baseball hat?" I am not sure why he thinks I run off to do some secretive pleasure sweeping at night, but I am not about to set the record straight.

Can you keep a secret? My evenings look more like this:


The best guacamole ever

2 avocados
1-2 Tbsp. fresh lemon juice
2 green garlics, sliced thinly (Is that how you pluralize it? I would say green onions, so I guess it is right. It just sounds funny.)
2 Tbsp. fresh chives, sliced thinly
A handful of fresh cilantro, chopped up real small
salt and pepper to taste.

Just mash the avocados, stir in the rest, and get ready to dip your chips. Or your spoon.

Monday, April 25, 2011

You be the judge

I can't decide if the appetizer I made the other day is a white trash food or not. One could argue that the fact that I am questioning this is proof enough, but I want to take a poll before deciding.

On the one hand, it does contain fresh, seasonal produce (Not white trash)


Is your head tilting to the side? I didn't realize I take all my pictures at the same angle!


On the other hand, it also contains white bread. With the crusts cut off. (SO white trash)

Back on the first hand, it also involves making an herb-infused butter (not white trash).

But, back on the other hand, it also contains big chunks of cheddar cheese (pretty trashy)

This recipe came from Sunset Magazine (not trashy) and was clipped out by my mother (also not trashy). In March of 1978. Oh yes, 37 years ago. While 1978 was a fabulous year for new things (like little baby girls), it wasn't a good year for recipes that take into account cholesterol, fat, processed sugars, or carbohydrates. (Does that make it trashy or not? I can't decide. On the one hand, great year. On the other hand, not so healthy. But on the other, other hand, they didn't know any better. It's not their fault).

At any rate, let's take this Sunset recipe, these herbs and vegetables, and this white bread, and make a delicious appetizer. As long as you don't think about what exactly you are consuming, you will thoroughly enjoy it.

First, we need herbed butter. Dice enough cilantro to make 1 tablespoon. Slice thinly enough green onion (or in my case, spring red onion) to make 3 tablespoons. Also, measure out 1/2 teaspoon dill. Mix these herbs, along with salt and pepper to taste, into 1/2 cup softened butter.

Next, we will assemble the rest of the ingredients:

Trim and blanch a bunch of asparagus stalks. Count out a slice of bread for each stalk of asparagus (I did 18). Trim the crusts off of the bread. Cut sharp cheddar cheese into sticks that are about 3 inches long, and 1/4 inch in diameter.

Now, we'll begin to build our roll-ups. 

Take a slice of bread, and flatten it with a rolling pin. Spread evenly with butter mixture.


Place a spear of asparagus and a stick of cheese onto the bread.


Roll it up, and secure with a toothpick. Once you have finished all of the rolls, melt a1/4 cup of butter, and brush over all of the rolls.


Place them in the oven broiler, about 5 inches from the heat source. Let them toast for about 5 minutes, and enjoy!


Here is the recipe in a more concise manner:
about 18 asparagus spears
6-8 ounces of sharp cheddar
1 loaf of white bread
3/4 cup soft butter
1 T. chopped cilantro
1/2 t. dill
3 T. sliced green onion or spring onion

Clean, cook, and drain asparagus spears. Cut cheese into sticks that are 3 inches long and 1/4 inch diameter. Trim crusts from 18 slices of bread and flatten each with a rolling pin. Combine 1/2 cup of the butter with the cilantro, dill, onion, and salt and pepper to taste. Spread evenly over one side of the bread slices, and top each with an asparagus spear and cheese stick. Roll each slice, secure with a toothpick, and place on a baking sheet. Melt remaining 1/4 cup of butter and brush evenly over rolls. Broil 5 inches from the heat source, for about 5 minutes, until golden.

Wednesday, April 20, 2011

hot potato

When I unpacked my box last week, I had a little internal conversation. Please, come on in to my brain:

"Potatoes? What the heck am I going to do with more potatoes?"
"You could... eat them."
"Oh. Yeah."


Was it Freud who said "Sometimes a veggie is just a veggie."?

Rather than mash them, fry them, cook them into soup, or add them to a casserole, I decided to just bake them and eat them. I set up a little do-it-yourself potato bar, after reading about what Melanie did over here.

The family was invited to build their own baked potatoes. I had ground beef, black beans seasoned with caramelized onions and chicken stock, sour cream, cojita cheese (a soft Mexican cheese), chopped cilantro, chives, and jalapeno peppers. Not surprisingly, the kids opted out of all things green. However, having the chance to fill their own plates eliminated all complaining whatsoever. I couldn't ask for anything more.

Friday, April 8, 2011

One salad, coming up. Chop-chop.

I moved to my current town about 10 years ago, and when I did we had a double income, and no kids. In other words, I ate at restaurants a heck of a lot more often than I do these days.

I came from a fabulous city on the beach where there were more than a fair share of ethnic restaurants of every kind, and I came to a city 50 miles inland, where there are chain restaurants and barbecue places. (It has gotten a bit better in the past 10 years. I'll be okay.) I went from being spoiled to being petulant.

One thing I noticed at the time was that all of a sudden, every restaurant happened to offer a "barbecue chopped salad." I am not sure if that was the case everywhere in the United States at the time, or the town I moved to. This town has more than it's fair share of barbecue restaurants, mind you.

I like to think that the barbecue chopped salad originated in New Mexico. I imagine that people in New Mexico eat black beans and corn with every meal. I have never been to New Mexico, but I am sure it must be true.

Whether this salad came from New Mexico or my little city here; whether it is a local thing or a thing of its era, this salad seems to be in every restaurant around me.

I love it. It has enough protein and fiber to be a meal, lots of nutrition, and enough different ingredients to keep it interesting enough to eat often.

The only problem is that 2 of 3 little guys around here won't touch a salad with a 10-foot pole. That is a hurdle that I plan to overcome someday. Just not yet.

Last night I was attending a fundraiser for breast cancer, and I knew that there would be pizza available for the kids. Since they were all taken care of with their favorite dinner, I took the chance before we went out, to enjoy one of my own favorite dinners too.


In case you live in a remote corner of the United States where they don't have a barbecue chopped salad, it is:
lettuce
cilantro
black beans
tomato
corn
green onions
cheddar cheese
grilled chicken
avocado

tossed with ranch dressing and barbecue sauce