New Here? Read The Story behind the Box

Showing posts with label onion. Show all posts

Sunday, June 24, 2012

Tandoori Turkey Burgers

Last week, we did Cub Scout camp. For five days, I spent the hours between 8:30 and 5:30 at a campsite, helping boys do crafts, shoot arrows, use slingshots, cook in a cardboard box oven, play football and badminton, and generally just be dirty, busy, loud, active, competitive boys. My two sons participated in camp, and my daughter worked her tail off as a junior volunteer.

Each night, we came trudging into the house, peeling filthy socks off our feet, dropping the camp t-shirts into a pile, and flopping onto the couch. 

Dinner needed to be something simple, and something quick for these kids who had run, climbed, swam, and hiked all day long in the hot sun. They were hungry and tired... not a great combination.  


These turkey burgers did the trick! They are pretty simple to throw together, they can be grilled in just a couple of minutes (while the kids hose the first layer of grime off each other), and they are TASTY. Topped with cilantro, onion, and cucumber, and a delicious yogurt sauce, they are nice and light and flavorful, just perfect for a hot night.

The recipe came from Bake Bree, and I only made a few tweaks. 

Tandoori Turkey Burgers

1 pounds ground turkey
4 green onions
3 Tablespoons grated fresh ginger
2 Tablespoons lemon juice
1 Tablespoon paprika
2 teaspoons cumin
1/2 teaspoons ground cardamom
salt and pepper to taste
Pita bread
persian cucumber
cilantro
red onion sliced thinly

yogurt sauce:
1 small container plain Greek yogurt
1 Tablespoon fresh mint, chopped
2 teaspoons cumin
1 Tablespoon fresh lemon juice
salt and pepper

Using your hands, combine the turkey, green onions, ginger, lemon juice, and spices. Form into 4-5 patties. Grill over medium-high heat until cooked through. Grill the pita bread for the last couple of minutes.

Meanwhile, stir together all of the ingredients for the yogurt sauce.

Place a burger patty onto each piece of pita bread. Top with the cucumber, cilantro, and onion. 


Drizzle on some sauce, and enjoy!


Thursday, May 10, 2012

Broccoli Salad with golden raisins and sunflower seeds

Although there were a few years where I would have never admitted it, my mom is pretty dang hip.

I mean, for a woman is in her 40s  in her 50s   old enough to be my mother, she is athletic and active, perpetually busy, and extremely social. She would probably consider herself to be relatively conservative, but I happen to know that she is very open-minded, willing to live and let live, always interested in learning more, and ever-willing to change her opinion as she gathers more facts.

And, despite the fact that just the other day, an email from her read "I am trying to use John's iPad...."
(Trying? To use an iPad? They are, by design, easy enough for a toddler to use.)... She is actually pretty modern, forward thinking, and up-to-date.

Want proof?

This salad.


My mom has been making this salad for quite a while now. It is a totally awesome salad.

Coming along in her wake, this salad has become suddenly popular. Coincidence? Perhaps. But all of a sudden I see that Costco has a kit to make this salad. And Souplantation now considers it one of their signature salads. And try searching "broccoli salad" on Pinterest. Mmm hmm. There it is, all over the place. If Pinterest doesn't convince you that we are standing on the very brink of trendiness, what will?


However, until all these places and people start renaming their salad "Katy's Broccoli Salad", you are going to have to just believe me. My mom is awesome.

(And... she is also not big on attention. Which means that I have to figure out somewhere to hide as soon as I publish this.)

Broccoli Salad
1/2 cup mayonnaise
3 tablespoons sugar
3 tablespoons red wine vinegar
1/2 teaspoon salt
1-2 heads of broccoli, cut into florets
1/2 red onion, diced
1/2 red bell pepper, diced
1/4 cup roasted sunflower seeds
1/4 cup golden raisins

In a large bowl, whisk together the mayonnaise, sugar, vinegar, and salt. Add the remaining ingredients, and toss to coat. Refrigerate until ready to serve.

Thursday, March 29, 2012

Larb (Thai Salad)

Oh happy day! I love when I discover that one of my favorite, special occasion, once-in-a-while treats can be made easily and with great results at home!


Larb has always been one of my favorite things to order at a Thai restaurant, when I am being schmancy and ordering appetizers. It seems like an appetizer to me, that is, but it is usually found under the salad portion of the menu. (maybe because the veggies in it are added at the end and not cooked?) If you have never had it, either make this version or go to a Thai restaurant (tonight!) and order it. You won't regret it. Despite the unfortunate-sounding name (to our western ears) the dish is to. die. for.


Before I move on, I feel I need to give props to Laos. I discovered, in looking up some different versions of Larb recipes, that it is actually the national dish of Laos. Who knew? I haven't been to a Laotian restaurant (or Laos for that matter), but I know what I will be ordering if I ever do go! (To either a restaurant or the country, that is). I also learned that a portion of Thailand used to be Laos (Again, who knew? I am clearly not up to snuff on my Asian history), and that this dish is common mostly in that part of Thailand. Well. I am glad for that, because that means it made it into some of my favorite restaurants. And if you live in town, go to Thai Pepper on Main Street and order the Larb. It's number 19 under the ... you guessed it... salad portion of the menu. Not only is the food fabulous, but so is the adorable older couple who own the place.

Ahem. Back to the appetizer salad recipe at hand. Larb is a mixture of meat (I have seen it made with chicken, beef, turkey, and pork), lime juice, fish sauce, and cilantro and onions. All flavored with garlic and ginger.


I found this recipe thanks to Rachel at De Ma Cuisine, who does the weekly cooking show and meal planner for Abundant Harvest. If you are an AHO subscriber (or just a lover of fresh delicious veggie-loaded food), check her out! She is adorable, her show is fun, and her recipes are yummy. Anyway, Rachel had included this on her weekly plan when we got cabbages in her box. The recipe was listed as Thai Beef Cabbage Cups, which intrigued me. When I saw the subtitle (Larb), I was hooked.

I followed the recipe more or less, but I added a little fresh basil, and forgot the peanuts (accidentally). It's perfect! I think I will try making it with turkey next time, since the beef tastes still rather beefy, and I think the turkey might take on more of the flavors of the garlic and ginger, but I am not complaining. I am in love!


Larb

2 1/2 teaspoons dark sesame oil, divided
3 teaspoons minced fresh ginger
3 garlic cloves, minced
1 pound ground sirloin (or turkey, or chicken, or....)
1 tablespoon sugar
2 tablespoons fresh lime juice
1 1/2 tablespoons fish sauce
1/4 teaspoon crushed red pepper
1/2 cup vertically sliced onion
1/2 cup chopped fresh cilantro
1/2 cup chopped fresh basil
8 large cabbage leaves
2 teaspoons finely chopped peanuts

Heat a skillet over medium-high heat. Add 2 teaspoons of the sesame oil to the pan. Add the ginger and garlic and cook for one minute stirring constantly. Add the meat and cook, stirring to break it up, until it is done all the way through.

Combine the rest of the sesame oil, sugar, lime juice, fish sauce, and crushed pepper in a large bowl When the meat is cooked, add it to the bowl along with the cilantro, basil, and onion, and toss well.

Divide the meat mixture into the cabbage leaves, and serve. (At this point, you may want to go ahead and add the peanuts. I wish I had!)


Thursday, March 15, 2012

Irish Nachos

What with St. Paddy's Day right around the corner, I decided to combine two of my favorite things: My wee bit of Irish heritage and guacamole.


I have had Irish nachos in pubs and restaurants, and I've made them at home many times. The concept (if you've never been so lucky as to enjoy the experience) is simple... Take all that is amazing about a plate of fully loaded nachos (sour cream, guacamole, cheese, onions, meat) and put it on potatoes instead of tortilla chips. The potatoes aren't as conveniently scoop able and finger-food-ish as the chips are, but on the other hand they are quite a bit more filling and help to justify using this appetizer-y, snack-y food as a meal.


Ha! As if I felt a need to justify eating this for dinner! It's damn delicious and much preferable to may other things I've eaten for dinner. That's good enough for me.

I have seen many recipes and suggestions for how to build your Irish Nachos. I think the best I have seen is Gaby's at What's Gaby Cooking. I used her recipe, with a few additions (sour cream!), and a couple substitutions (beef instead of turkey... I mean, Irish is Irish!). Really, Gaby is adorable and her recipes are delicious, and her photography is amazing. You should check out her original post and everything else she is cooking. But be prepared to find yourself suddenly starving.

Here is my version of Gaby's Irish Nachos:

2 russet potatoes, skin on
1 red bell pepper, cut into bite-sized pieces
1 yellow bell pepper, cut into bite-sized pieces
1 smallish onion, cut into bite-sized pieces
1 pound ground beef
salt and pepper
2 teaspoons paprika
2 teaspoons olive oil
1 cup cheddar cheese
1/2 cup salsa (I used the salsa I canned last summer, you can use the kind you love best)
1/2 cup sour cream
guacamole (the more, the better, in my book)

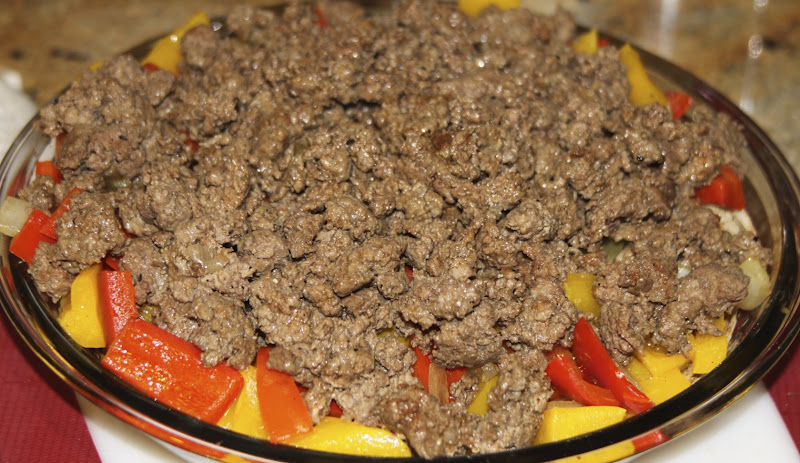
Preheat the oven to 350. Slice the potatoes and layer them in a pie plate or similar-sized baking dish. Sprinkle them with one teaspoon of the paprika, salt and pepper. Then drizzle it all with olive oil and bake it for 35 minutes.


While the potatoes are in the oven, slice the bell peppers and onion. Sauté them in a pan over medium heat for about 10 minutes. You want them to be softened a bit, but still something to bite into. Turn them out onto a plate and then brown the beef in the same pan, with the remaining teaspoon of paprika and some more salt and pepper.

When the potatoes are done, layer them with the vegetables.


And then the beef.


Spread the cheese over all of this, and pop it back in the oven for a few minutes, until the cheese melts.

Top it with salsa, sour cream, and guacamole.


And enjoy the best thing that ever came out of the old world's invasion discovery of the new world. So good, in fact, my husband said "Would you stop taking pictures of that and please let me eat it? I can't wait any longer!" So, I never got the shot I was looking for, but my belly never complained.


This post is linked to the Improv Challenge hosted by Kristen at Frugal Antics of  Harried Homemaker. Check out what everyone else did with potatoes and cheese!


Improv Challenge


Thursday, February 23, 2012

risotto and roast cauliflower

I used to be an English teacher. I taught high school, and within the high school I was happiest teaching seniors. Senior year of high school is a magical time. Suddenly, the kids are almost free. They can see the light at the end of the tunnel. They know that soon... soon... they will be done with assignments in classes they never wanted to take in the first place. Soon they will be done with curfews and dress codes and living by their parents' rules. They will be off to their "real lives," and moving out and trying on college or jobs or roommates or rental agreements. They are young enough to be completely idealistic, ready to end world hunger or animal abuse or the sex trade. They are young enough that they aren't quite adults, and they are young enough to still need adults to guide them, advise them, cheer for them, and console them. And yet, they are finally old enough to admit it. Most of the time, they know when and where to swallow their pride. They know when to stand up and fight, too. They are some of the most loyal people you might ever meet. They will do anything for a friend, but won't be walked on. They They are old enough to know better, to understand the rules, and how to play the game.

But still, they are kids. And like the seventeen previous years, they aren't always on their best behavior. They often make bad choices, give in to laziness, wallow in cattiness. They have a sense of being done with being controlled and ruled, and sometimes they become belligerent or defiant. They also have learned, quite well, that often times the consequence is well worth the fun of the transgression.

All of this is to say that by the time I had English students in their 12th year of taking English classes, I had kids who knew how to handle English class. They knew what grade they wanted (maybe just to pass and graduate, maybe to get into Harvard or MIT). They knew exactly how much work it would take to get where they wanted to be. Some felt fine skipping homework because they knew it would balance out come exam time, and the "C" would be secure. Some begged for extra credit... to raise their "A" to ... I don't know... a better "A"? A more secure "A"?

And no matter what, with plenty of regularity, there was an assignment and a kid who just didn't match up. Even the top achievers found an essay or book or poem they just couldn't care about. But that is where the comedy comes in for the teacher. Watch a gifted writer, a sponge of a reader, a deep-thinking, idealistic 18-year-old, produce 3 pages of writing about a book he would rather ignore (or perhaps, a book he did ignore). It makes for some highly amusing reading.

"The novel's imagery is developed through a series of descriptions."

"The juxtaposition of the light and dark in the first stanza is quite noteworthy."
(Oh, do the smart ones love the word juxtaposition.)

"The characterization of the antagonist shows him to be vile."

And one of my favorites:
"The main character was very very very very very very very heroic."

As you can see, those smarter-than-their teacher, brilliant high school almost-grads can find an amazing balance between very sophisticated vocabulary and lack of actual thought, and come up with three pages (or one, or seven), about anything. And equally importantly, about nothing.

But. But maybe I didn't always give them enough credit. Maybe they wanted to do better, but they had a biology test and a history report due the same day as my essay. Maybe they needed to work harder on their science grade or make up for lost time in Spanish class. And maybe the soccer coach called an extra practice the night before, or maybe they got off work late. Or maybe they were just plain tired.

Because here I sit, wanting to tell you about the risotto I made last night to go with yet more of the roast vegetables from earlier this week. It was fabulous. Such simple ingredients, such an amazing treatment. It was rich and creamy and flavorful, and all of the other adjectives I have used one.million.times. (In three days it will be a year since my first post, and I am running out of ways to describe food). I am not really sure how to explain that I found this risotto and cauliflower to be an all-around perfect meal, without saying...

It was very very very very very very very delicious.


It is a simple risotto, cooked the old-fashioned way of stirring and stirring and adding liquids slowly, and stirring, and then ending with the addition of a great handful of parmesan cheese. And then that was topped with the pre-roasted cauliflower that I had stored in the fridge.


Just for a minute, though, can I talk about the cauliflower? This was a Romansco cauliflower. Have you ever seen one? It is wild! It looks like the salt crystals that you can grow from a kit on a little piece of cardboard. It also looks like a neon-green forested mountainside. At the same time, it looks like a piece of tropical coral. It is simply awe-inspiring. I had to do a little photo shoot with my cauliflower before I could cut it into bits and turn this bright, hobby, reaching, leggy being into something so banal as ... dinner.


okay, back to our recipe. The risotto.

First, chop half an onion and cook it in some butter until it is soft. Add a half cup of dry white wine and let that cook down by half. Add a cup of rice, and a big pour of vegetable or chicken stock. Keep stirring the rice and liquids, for about 25 minutes. Any time you see that your spoon leaves a trail that isn't immediately filled with starchy, rice-y broth-y liquid, add more stock. You want it to keep wet. Keep adding stock and stirring until the rice is al dente. All in all, I used just about 3 cups of chicken stock. Just before it is done, add a big handful of grated parmesan and a half-handful of chopped fresh parsley.

Then, in individual servings, make a little volcano of risotto and top it with the pre-roasted, re-warmed vegetables. I used the cauliflower, but I think broccoli would do very well, as would the beets.


Wednesday, February 22, 2012

Roasted Vegetable Salad

So, now that you followed yesterday's instructions and roasted a huge pile of veggies, you may want some ideas of what to do to serve them. You did roast a huge pile of veggies already, no?

Plus, today being Ash Wednesday and all, this is an amazingly filling dinner salad that contains no meat. Win-win!

This was the first meal I made from the book An Everlasting Meal by Tamar Adler. I followed her instructions to roast my veggies and sauté my greens, and then I made this salad with those roast vegetables.

Oh my goodness was it amazing! I couldn't get over how much I was enjoying my dinner. The vegetables were absolutely amazing, they paired perfectly with the peppery greens, and the vinegar brought out the best of all of it.

And the best part of all of it was that it really was as easy as can be imagined to put it all together after I spend the morning prepping the vegetables. Dinners this week really should be a piece of cake to get on the table!

First, take the vegetables out of the fridge for at least a half hour before you plan to eat. This will allow them to come to room temperature (which makes the first sensation you experience to be flavor, rather than temperature).

Thinly slice a bit of red onion, or a shallot. Place it in the bottom of a medium-sized bowl, and sprinkle some red wine vinegar on it. Let that sit and soften the onion for about ten minutes. Add a teaspoon or so of mustard and let that sit another couple of minutes.

Add the vegetables you plan to eat with your salad to the vinegared onions. I used the broccoli, cauliflower, carrots, potatoes, and brussels sprouts that I roasted yesterday. Toss it all together, and let it sit another couple of minutes for the vinegar to penetrate the veggies. Drizzle it all with a good helping of olive oil.

Make a bed of bitter or peppery greens on each plate. I used the arugula that I got in my Abundant Harvest box this week. I piled the dressed vegetables on top of the greens, and sprinkled some of the roast nuts that I did in the oven yesterday on top of it all.


Again, I can't get over how delicious this salad was. Just trust me. And then find out for yourself!

Coming tomorrow... the best little sautéed greens sandwich this side of the Mississippi.

Wednesday, February 1, 2012

broccoli and cauliflower salad

There are those out there who declare that raw is the only way to eat vegetables, and that cooking anything means breaking it down and losing some of its nutritious value. I can't say I know much about that. I imagine it has a decent dose of validity to it, but I also know that breaking vegetables down might not necessarily be the worst thing possible. I also know that there are degrees of truth, and that the method and length of cooking makes a big difference.

What is important is that you eat your veggies. If you cooking them is what will make them appeal to you, by all means cook 'em up and enjoy them. If eating them raw seems better, eat them raw. Just make sure you are getting a good variety and a great amount of fruits and vegetables in your diet.

For myself, I have a pretty good balance. Obviously things like potatoes need to be cooked, most fruits are eaten raw, and plenty of other things are good both ways. Like broccoli. A few weeks ago I did a series of ten recipes for cooking broccoli. Today, though, let's keep the stove turned off and the oven cool.


This salad has become an old standby at my house. It keeps well in the fridge for a couple of days, so I can make a big batch and enjoy it for dinner, as well as the next couple of lunches. It is very easy to throw together, and has a great sweet and tart flavor. As soon as I saw that there was both broccoli and cauliflower in my Abundant Harvest box this week, I knew that this was going to be on the menu.

I have had an abundance of rutabagas lately, and I have been throwing one into just about everything I cook, including this salad. If you have one, feel free to throw it in. If not, don't even bat an eye. It's not intended to be there, and it won't be missed.

Broccoli and cauliflower salad
This salad is best if it can be made ahead and allowed to chill for a few hours. Try to plan ahead! (This also makes it great for dinner on a busy weeknight).

1 head cauliflower, cut into florets
1 head broccoli, cut into florets
1 red onion, diced
1 small-medium rutabaga, diced (optional)
1/3 cup raisins
1/4 cup roasted salted sunflower seeds

Dressing:
1/3 cup mayonnaise
2 tablespoons red wine vinegar
1/4 cup sugar

Chop all the veggies and toss together in a large bowl. In a small bowl, whisk together the dressing ingredients. Toss the salad with the dressing until evenly coated.

Thursday, January 19, 2012

Martha Stewart's creamy cauliflower soup with greens


My recipe yesterday was a little bit labor intensive, no? Let's switch things up today, and talk about a soup that is far more rich in the veggies, while taking a fraction of the amount of time.


But first, let's talk about the little miracle in my life.


I work at a preschool, where my duties include... well, everything. I never really know what I am going to be responsible for until I arrive in the morning. I often supervise the playground, shop for the groceries that become the kids'  afternoon snack, or keep the toy storage room clean and organized. I stuff envelopes, accompany kids to the bathroom, and file paperwork. 


And, as it turns out, I do laundry. Due to a series of events that won't interest you in the least, our regular system of getting the school laundry (mainly the cloth covers for the little mats where the kids take their naps) broke down last week. When I arrived in the morning, I was greeted by some teachers in a slight panic, because they were going to have nowhere for the cherubs to lay down at nap time. If you have ever faced 40 kids who need a nap at the same time, you would panic too.


And so I gathered up the dirty items, a stack of magazines from the staff room, and some detergent, and I headed out to the laundromat. There is probably a whole blog post about the people one encounters in a laundromat, but for today, let's talk about my miracle, okay?


After I got the laundry agitating, I sat down with the magazines. I mentally pleaded Come on, magazines. I know that one of you is going to have a recipe that calls for lots of the veggies I have right now... While we're at it, is there any chance it can please be the cauliflower and collard greens? Oh yeah, one more thing. Please don't require a stop at the supermarket, kay?


And guess what!? Martha Stewart Living had a recipe that onehundredpercent answered my little prayer to the magazine gods. 


I introduce you to Creamy Cauliflower Soup. It, of course, uses cauliflower and collard greens. It also uses onion, fresh dill, and copious amounts of garlic, all of which I have on hand, all out of the Abundant Harvest Organics box. Other than that, all it required was olive oil, salt, pepper, and water. Hooray!


As if that weren't enough excitement among the industrial washers, the soup is really quick to put together. Saute the onions and garlic, simmer the cauliflower and collard greens, and puree it all. 


It is creamy (thanks to the cauliflower) without using cream. It is bright and fresh and filling, and the drizzle of olive oil and fresh pepper on top give it just enough heartiness to let it stand as a main course.


1 tablespoon extra-virgin olive oil, plus more for drizzling
1 medium onion, chopped (about 1 cup)
4 cloves garlic, chopped
Sea salt
1 medium head cauliflower (about 3 pounds), florets and stems cut into 1-inch pieces (8 to 9 cups)
4 1/2 cups filtered water
1/4 cup chopped fresh dill, plus more for garnish
5 large kale or collard leaves, or a combination, tough ends removed and leaves roughly chopped
Freshly ground black pepper
DIRECTIONS
Heat oil in a large pot over medium heat; cook onion, covered, until soft, 4 to 5 minutes. Add garlic and a pinch of salt, and cook for 3 minutes more. Add cauliflower and pour in filtered water until it reaches just below the top of the cauliflower.
Bring to a boil over high heat. Add 2 tablespoons dill. Reduce heat to low, and simmer until cauliflower is just tender, about 10 minutes. Stir in greens, and simmer for 3 minutes.
Let sit for 5 minutes to cool slightly. Stir in remaining 2 tablespoons dill. Puree soup in batches in a blender until very smooth, adding more water (about 1/2 cup) if it's too thick. Return to pot and reheat. Season with salt and pepper. Garnish with dill, black pepper, a drizzle of oil and a pinch of sea salt.

Friday, January 13, 2012

winter stew

My vegetables are telling me it's winter. They are coming up from underground, where the cold temperatures are helping them produce sugars, which make them nice and sweet and tasty.

The carrots I got this week were, by far, the very best carrots I have ever eaten in my life.

This week I got potatoes, rutabagas, beets, and carrots from under the ground. I also got a lot of other stuff, but for now let's talk about these bottom dwellers.

These root veggies just beg to be cooked slowly for a long time. They want to be roasted or stewed, releasing heat and aroma into the house for hours. It is just the thing you want for a long, cold, winter day,

Despite the fact that it has been rather warm and sunny here in southern Cali, I went ahead and made a stew.


It seems like the new trend (and by "new trend" I mean "back to the good old days") is to not use a recipe.

I have been reading quite a few cookbooks lately that actually provide very few recipes. They are centered on teaching the reader how to cook, rather than just giving measurements and instructions for one particular dish.

So, I decided to go ahead and give it a shot. After reading the chapter called "Stewing, Braising and Steaming" in the book Kitchen on Fire, I felt equipped curious to test their instructions, and to take my winter veggies and turn them into a stew. 

Plus, I have a whole bunch of chicken stock just begging to be used.

First, I went to the store to buy some stew meat. Although stew meat is usually the toughest (which is fine if you are going to stew it for a long time), and therefore the cheapest meat, I found that my market had tri-tip on sale for even cheaper than the stew meat, so I bought that.

I cut my pound of beef up into bite-sized chunks and browned it in a little bit of olive oil.

Once it was browned, I cut up my veggies and added them. I used, from this week's Abundant Harvest Box, three potatoes (peeled), two rutabagas (peeled), four carrots, one large leek, and one onion, all cut into bite-sized chunks.

I cooked this all on high for about 10 minutes, so everything could get a teeny bit browned and tasty. Then I added 3 cups of chicken stock and a small handful of fresh rosemary. Just before it started to boil, I reduced the heat and covered it, and let it simmer for about and hour and a half.

It turned out nice and sweet and delicious!


Friday, November 25, 2011

grilled broccoli and lemons and parmesan roasted broccoli and onions

This week is "Broccoli Ten Ways in Five Days" where I am trying out all 10 recipe suggestions Real Simple Magazine highlighted for broccoli in their September 2011 issue. Today is day five. You can browse day one, two, three and four if you'd like.


 Yes, indeed, I woke up this morning, Black Friday, the day after I went to bed in a food stupor, and did I rush out to buy the latest and greatest for those I love? No, I did not. I got up and cooked broccoli. For breakfast. 

Do you see how much I love you people? I didn't want to disappoint you by not finishing off the tenth broccoli recipe from Real Simple Magazine.  That, and I hate to not finish what I started.

Anyway, I hope you all had a wonderful Thanksgiving, full of family and fun, love and laughter. I know I did.

Grilled Broccoli and Lemons

This recipe was the last one I made (just 20 minutes ago). I was only avoiding it because the thought of getting the girl fired up seemed like so much work. As it turns out, I wouldn't get the grill fired up just for this broccoli probably, but if I were planning to grill dinner, this is an excellent side dish.

Cut 1 bunch broccoli into 8 large spears and cut 2 lemons into quarters. In a large bowl, toss with 2 tablespoons olive oil; season with salt and pepper. Grill the broccoli and lemons over medium heat, turning occasionally, until tender and lightly charred, 10 to 15 minutes. Squeeze the lemons over the broccoli and drizzle with additional olive oil.


Parmesan Roasted Broccoli and Onions

This was the family favorite of the 10 broccoli recipes. As a matter of fact, my daughter asked "Can we have this a lot more often?" For something so simple, folks, we have a winner!

Toss 1 bunch broccoli (cut into florets, 6 cups) and 1 small red onion (cut into wedges) with 2 tablespoons olive oil and 1/2 cup grated parmesan on a rimmed baking sheet; season with salt and pepper. Roast at 425 F, tossing once, until tender, 20 to 25 minutes.


Friday, November 11, 2011

Veggie and Sausage Roast

This meal was actually billed as "Lazy Sunday Casserole." Well, as a rule I don't do casseroles. I make exceptions from time to time, of course. Like when my husband mentions two or a hundred times that he would just die for some Green Bean Casserole. Or once in a  great while when I'm going out and I feel guilty about giving the kids a frozen pizza, I might make a casserole I remember from my childhood. 

But typically? This is a no-casserole zone. Purposely.

However, if you look at this beautiful dish, you will have to agree that this simply got misnamed. I mean no offense to Kay at Kayotic Kitchen which is where I got the recipe. I love this dish, I do. Which is exactly why it can't possibly be a casserole.


Anyway, the lazy part of the name, on the other hand, is correct. There is little to do except allow for plenty of time resting while the oven does the work, and some time chopping beforehand. 


The great thing about this casserole is that is calls for exactly what you happen to have on hand.  Really. The vegetables are completely interchangeable. I would be sure to always include the sausage, as well as carrots and potatoes the way Kay suggests, but beyond that... you choose!

I happened to have celery and onions on hand in addition to the carrots and potatoes, so that is what went into mine. Kay had a fennel bulb and bell pepper. I could also see using parsnips, turnips, corn, broccoli, asparagus, cauliflower... I could go on forever. Use what you have. Or buy what looks good. It's completely up to you!


At any rate, here is how it all comes together:

4 Italian sausages
1 pound potatoes, cut into wedges
3-4 carrots, cut into 2-3 inch pieces
3-4 stalks of celery, cut into 2-3 inch pieces
1 large onion, cut into wedges
3 garlic cloves, minced
2 tablespoons oil
salt and black pepper
1 1/2 teaspoons Italian herbs
1/2 cup chicken broth

Preheat the oven to 450.

Wash and cut the vegetables. Place them all in a large roasting pan. In a small bowl, combine the garlic, oil,  salt, pepper, herbs, and broth. Pour it all over the vegetables and toss. Cover the pan with aluminum foil and bake for 45 minutes, until the veggies are just becoming tender.

Cut the sausages in half. Add them to the baking pan, and put it all back in the oven (uncovered) for about 30 more minutes, turning the sausages over about halfway through. When the sausages are cooked through, take it out and enjoy a very easy meal!

Thursday, October 27, 2011

green bean casserole (with real green beans!

Isn't it funny how different families interpret traditions differently? Like almost everyone I know has Santa come down the chimney on December 24, but not at all in the same way. Does he wrap his gifts or doesn't he? Doe he give the children all of their gifts, or are some of them from Mom and Dad? Does he leave a note on the cookie plate or just some crumbs? Does he bring everything the kid asked for and more? Or does he pick and choose from the wish list?

And then there is Thanksgiving. While nearly everyone has a turkey, there are those families who wouldn't dream of veering from a standard set of side dishes, and those who like to try something new every year. Cranberry sauce or cranberry relish? Canned or fresh? Should the stuffing go int he bird or in a casserole? Can you believe my husband's family doesn't care whether there is a pumpkin pie or not, as long as the chocolate pies are fresh and plentiful?

Anyway, I had never heard of green bean casserole until I met my husband. You know the one, with the French's dried onions on top and the recipe that comes on the side of the onion can? (I mean the casserole has onions on top, not my husband). Well, apparently, in his family that has almost no traditions whatsoever for any holiday, the green bean casserole is not to be left out of Thanksgiving.

So, when I mentioned to my mother that my new boyfriend would come to Thanksgiving and he really loved this green bean casserole stuff, she said, "Just the one with the Campbell's soup and the fried onions? No problem. I can make that." What? You know about that stuff, Mom? I've never eaten it!

Anyway, for better or for worse, the green bean casserole with the mushroom soup and the freeze-dried onions graced the Thanksgiving table unfailingly for many years. Somewhere in the ensuing 18 years it got, ironically, dropped from Thanksgiving at my in-laws. My mother, however, will always make it for my husband if we are going to be at her house on Thanksgiving.

So when we got our first green beans in our Abundant Harvest box at the beginning of the summer, my husband said "We could make green bean casserole!" I made stir-fry. When we got our next batch my husband said "We could make green bean casserole!" I made green bean fries. And one week I made a green bean salad and one week I even wrapped green beans into little bacon-y bundles.  I roasted them and blanched them and sautéed them. But I didn't make green bean casserole. I mean, the point of green bean casserole is to take a bag of green beans out of the freezer, a can of soup and a can of onions out of the pantry, combine and bake. It really doesn't taste good and it is really unimpressive. Why invest a lot of time and effort into that?

Well of course you know where this is going. When I got the fresh box this last Saturday, I went to put the green beans away in the refrigerator... right next to the green beans from the week before. Okay, I said to myself, this is silly. Whatever am I going to do with TWO huge bags of green beans? And then this little voice in my head (that sounded eerily like my husband's voice) said "You could make green bean casserole."


Oh, okay!!! I'll do it!

So I googled it, and I found Alton Brown's recipe for "The Best Ever Green Bean Casserole." I think that is a little like saying "The best ever blank sheet of paper." Or "The best ever square of sidewalk." I'm not going to argue that it isn't the best ever, but really winning that title doesn't give you too much in the way of bragging rights. 

However, (and I feel like I say this a lot on this here blog) although I went into this a little dubiously, I was very pleasantly surprised. This turned out to be very different from the traditional old frozen beans and mushroom soup standard, despite the fact that it is made with green beans, soupy mushrooms, and crisped onions. It is, of course, fresher and crisper. It is creamy and mushroomy, but lighter, and the beans actually taste like beans. I know, it's a strange concept.

At any rate, it was a hit at our house, and I guess if you are going to make green bean casserole, this is the one to make. It is delicious, for a casserole. It is far crisper and more flavorful than the name casserole might connote. And the onions are to die for. It just doesn't hold a candle to green beans wrapped in bacon. But then, bacon is a very unfair competitor.


So, here is Alton Brown's recipe. I didn't change a thing.


Ingredients

For the topping:

  • 2 medium onions, thinly sliced
  • 1/4 cup all-purpose flour
  • 2 tablespoons panko bread crumbs
  • 1 teaspoon kosher salt
  • Nonstick cooking spray

For beans and sauce:

  • 2 tablespoons plus 1 teaspoon kosher salt, divided
  • 1 pound fresh green beans, rinsed, trimmed and halved
  • 2 tablespoons unsalted butter
  • 12 ounces mushrooms, trimmed and cut into 1/2-inch pieces
  • 1/2 teaspoon freshly ground black pepper
  • 2 cloves garlic, minced
  • 1/4 teaspoon freshly ground nutmeg
  • 2 tablespoons all-purpose flour
  • 1 cup chicken broth
  • 1 cup half-and-half

Directions

Preheat the oven to 475 degrees F.
Combine the onions, flour, panko and salt in a large mixing bowl and toss to combine. Coat a sheet pan with nonstick cooking spray and evenly spread the onions on the pan. Place the pan on the middle rack of the oven and bake until golden brown, approximately 30 minutes. Toss the onions 2 to 3 times during cooking. Once done, remove from the oven and set aside until ready to use. Turn the oven down to 400 degrees F.
While the onions are cooking, prepare the beans. Bring a gallon of water and 2 tablespoons of salt to a boil in an 8-quart saucepan. Add the beans and blanch for 5 minutes. Drain in a colander and immediately plunge the beans into a large bowl of ice water to stop the cooking. Drain and set aside.
Melt the butter in a 12-inch cast iron skillet set over medium-high heat. Add the mushrooms, 1 teaspoon salt and pepper and cook, stirring occasionally, until the mushrooms begin to give up some of their liquid, approximately 4 to 5 minutes. Add the garlic and nutmeg and continue to cook for another 1 to 2 minutes. Sprinkle the flour over the mixture and stir to combine. Cook for 1 minute. Add the broth and simmer for 1 minute. Decrease the heat to medium-low and add the half-and-half. Cook until the mixture thickens, stirring occasionally, approximately 6 to 8 minutes.
Remove from the heat and stir in 1/4 of the onions and all of the green beans. Top with the remaining onions. Place into the oven and bake until bubbly, approximately 15 minutes. Remove and serve immediately.


Wednesday, October 19, 2011

salsa

What do salsa the condiment and salsa the dance have in common?

They're both made better by a margarita.

Although I wish I could say that I spent the day dancing the salsa with a handsome man named Javier, I can't. What I can say is that I spent a day canning salsa. As a matter of fact I canned enough salsa to last far longer than any relationship with Javier would.

When I say I spent a whole day, I really mean it. It was one of those days where I was in and out a lot, but in between, from 7 in the morning until 8 at night, I was chopping vegetables and boiling jars. This salsa recipe, that I got from the Ball Complete Book of Home Preserving, is not complicated. It doesn't need crazy ingredients or require unheard of steps. It just makes an enormous batch of salsa, and therefore requires an enormous amount of time chopping. As a matter of fact, when the kids asked what was for dinner, I looked around the kitchen and said, "hmmm...salsa?" There wasn't anything else to be had!

Actually, I felt a little bit like a pioneer while making this. Not like Pioneer Woman (she can do anything With élan and verve that I ain't got.). And not like those Mormon pioneers who came across the plains with their 18 children and covered wagons. Goodness knows I couldn't have done it without a drink at the end of one of those days of trekking across the wilderness. I felt rather like the kind of pioneer who "puts up" the veggies at the end of the harvest.  The person who had to preserve the food because when the summer ended, there would be no more tomatoes for another 9 months, and the would need it to last through the winter.

We only had four tomato plants, but they were prolific this year! Those tomatoes plus the tomatoes I got in the Abundant Harvest box turned out to be more than we could use all at once for a couple of weeks there. And so, the canning. Like I said, this recipe makes a heap of salsa. It used up all the tomatoes that were threatening to fall apart on the kitchen counter, plus some other spare parts slowly dying in the fridge. It does take a ton of chopping, but it makes a ton of salsa. And around here, a ton of salsa is a good thing (balancing out those margaritas and all). In the end, I had 6 pint jars plus 3 8-ounce jars of salsa. Yum.

I followed the Ball recipe exactly. I rarely follow a recipe 100%, but with canning I wasn't going to take any chances. If you want to preserve it, you have to be really careful with acid levels, so that bacteria doesn't grow when it's in the jars. Since botulism doesn't go as well with margaritas, I decided to just be safe. And so, here it is:


Zesty Salsa
Use whatever type of chili peppers your family prefers, and add hot pepper sauce if your tastes are even more daring.


10 cups of chopped, cored, peeled tomatoes
5 cups chopped, seeded green bell peppers
5 cups chopped onions
2 1/2 cups chopped seeded chili peppers, such as hot banana, Hungarian wax, serrano, or jalapeno
1 1/4 cups cider vinegar
3 cloves garlic, finely chopped
2 tablespoons finely chopped cilantro
1 tablespoon salt
1 teaspoon hot pepper sauce (optional)

1. Prepare canner, jars, and lids.

2. In a large stainless steel saucepan, combine tomatoes, green peppers, onions, chili peppers, vinegar, garlic, cilantro, salt, and hot pepper sauce, if using. Bring to a boil over medium-high heat, stirring constantly. Reduce heat and boil gently, stirring frequently, until slightly thickened, about 10 minutes.

3. Ladle hot salsa into hot jars, leaving 1/2 inch head space. Remove air bubbles and adjust headspace, if necessary, by adding hot salsa Wipe rim. Center lid on jar. Screw band down until resistance is met, then increase until finger-tip tight.

4. Place jars in canner, ensuring they are completely covered with water. Bring to a boil and process both 8-ounce and pint jars for 15 minutes. Remove canner lid. Wait five minutes, then remove jars, cool, and store.